Tuesday, November 30, 2010

Chestnut, Sausage, Pear and Dried Cherry Dressing


Perhaps the surprise star at the dinner table. This stuffing, or "dressing" if you will, was the best I have ever eaten and I'm proud to say that I made it! I knew that I wanted to incorporate chestnuts in it somehow. I've been craving it for a few Thanksgivings now but my family had previously opted to stick with our traditional celery, raisin, mushy stuffing. I make it sound gross...it's not. Actually quite good and it was what I was accustomed to. Now after having my new recipe, I don't know if I'll be able to go back.

The key difference between this year's recipe and my family's traditional recipe is the type of bread used. Rather than using standard store bought loaf bread that soaks up liquid and turns to mush (good mush, but much nonetheless) I used a ciabatta loaf from the bakery. I figured this would be a good middle ground between a soft loaf bread and a harder crusted peasant bread. This would allow me to keep the crusts on without risking a hard piece of crust in the final product.

I sifted through practically every chestnut stuffing recipe out there and could not settle on one perfect one that would incorporate all of the elements that I was looking for. So what did I do? Picked and chose precisely what I want to put in and threw it all together and crossed my fingers that it would turn out.

My final ingredient list included:

Chestnut, Sausage, Pear and Dried Cherry Dressing

3/4 loaf ciabatta bread, cubed and dried
1 medium onion, chopped
2-3 shallots, minced
butter
1.5 cups roasted chestnuts (I roasted my own, you could use store bought)
2 links of hot pork sausage, casing removed and crumbled
1/3 cup dry white wine
1 tsp. sugar
2-3 stalks celery, sliced
2 d'anjou pears, peeled and chopped
3/4 cup dried cherries, coarsely chopped
1/3 cup chopped parsley
3 Tbsp. sage, chopped
2 large eggs
2+ cups chicken stock
1/3 cup heavy cream
salt and pepper to taste

Tear bread into small bite-sized pieces and set in roasting pan or bowl. To dry bread, cover with paper towels and leave out overnight. Or, place on a baking sheet in batches and lightly toast. Set aside.

Brown sausage crumbles and set aside.

In a heavy-bottomed pan, over medium high heat, add 2 tablespoons of butter, and then add onion and shallots, season with salt and pepper, and cook, stirring occasionally, until just soft. Do not brown. Remove onions/shallots from pan and set aside.

Preheat the oven to 375 degrees F.

Add wine to pan and deglaze over medium high heat, cooking until wine reduces by about half. Pour remaining liquid over the onions. Wipe pan dry and add 2 Tbsp. butter. Add pears and sugar, and season with salt and pepper. Sauté pears, in batches if necessary, over medium high heat until they begin to brown slightly. Remove from heat.

In a large bowl or roasting pan, add sautéed ingredients to bread. Add celery, chestnuts, and cherries. Toss lightly to combine. Add sage and parsley and toss again. Pour in eggs and mix to incorporate. Slowly pour 1.5 cups stock over mixture and toss to combine. Taste and adjust for salt and pepper. Place stuffing in a 9×13 baking dish, and pour another cup of turkey stock over the stuffing, followed by the cream.

Bake stuffing for about 60 minutes, or until a golden crust forms on bottom. Serve immediately.


My mom said she wants this type of stuffing from now on. That made me feel proud. I gladly ate all of the leftovers and thought everything blended and complimented the other ingredients very well. I was afraid the hot sausage would ruin the dish but it actually added a nice contrast to the sweetness of the cherries and pear.

I think the key take-away for making a good stuffing is:
1. buy a good loaf of bread, nothing too hard or too soft
2. choose an array of ingredients that cover sweet, savory, meaty characteristics
3. use enough liquid to thoroughly saturate the bread.
4. cook long enough to bind everything together

With those components, I don't think you can go wrong!

Sweet Potato Soup with Cranberry Oil

I love the idea of having a soup as a starter for a Thanksgiving meal. It is something that can be made ahead of time and if the rest of the meal ends up taking longer than expected to prepare, it is an easy item to dish out to guests to curb their hunger. And if everything is prepared on time as planned, then it's a great, warming starter that shouldn't be too complicated in flavors, perfectly setting up the meal to come.

I wanted to incorporate sweet potatoes in my meal without having to serve both mashed potatoes and mashed sweet potatoes. At a typical Thanksgiving meal at home, the sweet potatoes are served in the form of Bourbon Sweet Potatoes...something that I loved as a child but have since lost interest in. My parents are not shy with the bourbon and I can't say it's my alcohol of choice. So when I was actually in control this year, sweet potatoes were going to be served in the form of a soup.


Sweet Potato Soup with Cranberry Oil


2 large orange-fleshed sweet potatoes
Salt
2 tbsp. olive oil
1 small yellow onion, peeled and chopped
1 medium leek, white part only, trimmed, cleaned, and chopped
2 medium carrots, peeled, trimmed, and chopped
1 rib celery, trimmed and chopped
2 cloves garlic, peeled and chopped
1/2 cup dry white wine
3.5 cups chicken stock
1/3 cup heavy cream
1 Tbsp. chipotle phuree
1/4 tsp. cinnamon
Freshly ground white pepper
1/4 cup Cranberry Oil, optional

1. Put sweet potatoes into a large pot and cover with cold water. Add 2 large pinches salt and bring to a boil over high heat. Reduce heat to medium and simmer until soft when pierced with the tip of a knife, 30–40 minutes. Drain and set aside until cool enough to handle.

2. Meanwhile, heat oil in a large heavy-bottomed pot over medium-high heat. Add onions, leeks, carrots, celery, and garlic and cook, stirring often with a wooden spoon, until vegetables begin to soften, about 5 minutes. Add wine, scraping any browned bits stuck to bottom of pot, and cook until alcohol has evaporated, about 2 minutes.

3. Add stock and reserved sweet potatoes to pot, increase heat to high, and bring to a boil. Reduce heat to medium and simmer until vegetables are very soft, about 30 minutes.

4. Working in batches, put vegetables and stock into a food processor or blender and purée until smooth, then return soup to pot. Stir in cream and chipotle puree, season to taste with cinnamon, salt and pepper, and bring to a simmer over medium heat. Drizzle some of the cranberry oil, if using, over each serving.

Cranberry Oil
1/2 cup fresh cranberries
1⁄4 cup extra-virgin olive oil
Salt and freshly ground black pepper

1. Put cranberries into a mortar and finely crush with pestle. Transfer to a small bowl, add oil, and stir to combine. Cover and refrigerate overnight.

2. The following day put cranberry mixture into a sieve set over a small bowl and gently press on solids with a rubber spatula to extract the red pulpy cranberry oil. Discard solids. Season to taste with salt and pepper. Whisk mixture before using.


The original recipe did not call for chipotle. However, it was what made the dish. When I tasted it prior to adding the chipotle, the flavor was good - fairly standard - but it needed something to make it great. I didn't want the soup to have an intense heat so I only added enough of the chipotle puree juice (the liquid in the canned chipotle chiles) to add some interest without adding noticeable heat.

For the cranberry oil, I had to puree the mixture in a food processor to extract the cranberry flavor and color. After letting the mashed cranberries soak in the oil for a day, the oil remained separated from the fruit and had not seeped in any flavor. The puree was nice with the soup. It added a little bit of rich tartness to the mellow and slightly sweet soup (sweet from the natural flavor of the sweet potatoes).

With tweaking to taste, this is a simple and comforting recipe, requiring only a few ingredients. The cranberry oil isn't necessary but is a welcome addition if you plan ahead.

Gingersnap Streusel Pumpkin Pie


This was perhaps the dish I was most excited about when it came to my homemade Thanksgiving meal. For the past few years, I've been in charge of making a dessert for the great November feast. Almost always I will make an apple pie of some sort, and possible something else if I feel inspired. Of course, I'm not the only one making dessert in these situations so there is always a traditional pumpkin pie that someone else has made - after all, what is a Thanksgiving without pumpkin pie? Though I don't really care for the traditional pumpkin pie and hardly ever partake in it when given the option to select my pie choice, pumpkin pie is one of those staples that must always appear at the dinner table on Thanksgiving. I'll compare it to the boring aunt that's always there - she's not an exciting addition to the table but something would be missing if she were absent. Thus, I opt to make the "exciting selection" and leave the preparation of the old classic to someone else.

This year, however, I was faced with a bit of a dilemma. Thanksgiving took on a whole new shape as my parents flew out from South Carolina and the four of us dined around my small round table in my small box of an apartment. Surely there would be no one else to bring the pumpkin pie other than yours truly. Because most of what I do is a tweak on an original, when I finally decided that it was I who had to make the pumpkin pie, I was not going to bring the "boring aunt" to the table. Nor was the "exciting friend" (apple pie or other) going to show up as there was no way I would be baking two pies for four people, that would be overkill. Thus, I searched the Internet far in wide for a perfect recipe that would turn the traditional pumpkin pie into and interesting and welcome guest at my dining table.

My inspiration was gingersnaps. My favorite pumpkin pie to date had been a frozen pumpkin pie with a gingersnap crust. Hardly a "pumpkin pie" in the traditional sense but so delicious and the flavors just blend together perfectly. I thought of just making a normal pumpkin pie with a gingersnap crust...but then realized that my Mom would be coming in town and she makes such a fantastic butter (or rather, shortening) crust, that I'd have to let her contribute that component to the Thanksgiving meal.

All of these planning obstacles and dilemmas came to a halt when I came across, in my mind, the perfect compromise of a pumpkin pie recipe:

Gingersnap Streusel Pumpkin Pie

1 flaky pie crust, unbaked
2 cups crushed gingersnap cookies (about 40)
1 cup chopped pecans
½ cup powdered sugar
¼ cup melted butter
about 2 cups fresh pumpkin pure (what a difference!!)
1 14 oz can sweetened condensed milk
2 eggs
½ cup sour cream
1 tsp cinnamon
½ tsp vanilla extract
¼ cup ground ginger

Streusel Topping
¼ cup flour
¼ cup brown sugar
2 Tbsp melted butter
¾ cup chopped pecans

Preheat oven to 350F. Fit pie crust into a 9 inch deep pie pan (preferably ceramic). Fold edges under and crimp as desired.

Stir together crushed gingersnaps, chopped pecans, powdered sugar and melted butter. Press mixture on the bottom and ½ inch up the sides of the pie crust.

Bake at 350F for 10 minutes. Let cool completely on a wire rack (about 30 minutes).
Whisk together pumpkin and next 6 ingredients until well blended. Pour into prepared crust. Place pie on an aluminum foil lined baking sheet.

Bake at 350F for 30 minutes. Sprinkle Streusel around the edge of the crust. Bake 40 minutes longer or until set, shielding edges with aluminum foil during last 25 minutes of baking if necessary.


This was one of the best, if not the best, pie I've ever had. And I'm not "tooting my own horn" it was really that fantastic. A flaky crust (I think the recipe my Mom followed was something like: http://allrecipes.com/Recipe/Basic-Flaky-Pie-Crust/Detail.aspx), with a spicy, sweet, almost gooey gingersnap streusel layer, fresh pumpkin pie filling, and a nutty topping...a combination to make me simple melt at first bite.

You may be wondering - what's the difference between canned pumpkin puree and fresh pumpkin puree. Well, the obvious initial difference is time and ease of use. Of course canned pumpkin is certainly easier to use...and it's quite tasty when prepared correctly. However, I took a little bite of canned puree and then some of my fresh puree and WOW - there's a difference. The canned tasted almost bitter in comparison to my sugar pie pumpkin puree. It was much darker in color (which I think is a positive...it gives the traditional pumpkin pie look), and much more dense. The final product was lighter and truly tasty.

There is absolutely nothing that I would change to this recipe. My only concern is...do I have to wait a full year now to make it again??

Thanksgiving Dinner 2010

The full view of our impressive Thanksgiving dinner. It would be far too daunting of a task to provide each and every recipe for the dishes that comprised the meal. In other posts I've provided the directions and comments on the ones that I personally prepared - the rest will have to simply be admired. And just a forewarning - the pictures are not good. To best depict each menu item, I should have individually plated them and taken isolated, artistic pictures. But really...it was Thanksgiving...who really want's to wait to eat just to take some pictures! So bare with me and just imagine that they have potential beauty...and most importantly...were all wonderful.

Welcome to my Thanksgiving Dinner Table (with my Mom as a host)


Our Thanksgiving 2010 Menu:

Appetizer:
1. Sweet Potato Soup with Cranberry Oil (reviewed in another post)


Main Course:

2. Neiman Ranch Heritage Turkey - $70 for a 10 lb turkey...thankfully the best turkey I've had. Roasted with Lemon and Herbs - simple presentation to accentuate the impressive flavor in the meat.


3. Gravy
Something with the turkey juices, a roux, chipotle, chicken broth...my Dad made it


4. Brussels Sprouts with Pancetta and Granny Smith Apples


5. Yukon Gold Mashed Potatoes
I wanted to do something very simple to go with the other exciting flavors on the plate


6. Ciabatta Stuffing with Roasted Chestnuts, Pears, Hot Sausage and Dried Cranberries
also reviewed elsewhere - incredible


7. Pomegranate Cranberry Sauce
a Derek specialty


8. Michel Schlumberger 1997 Chardonnay
Glad this could get put to good use and make some space in our wine refrigerator


9. Pumpkin Gingerbread Streusel Pie
I will make this again...no question


A Dark Meat Plate (Derek's):


A Light Meat Plate (Mine):


Where did all of that food go????

Root Vegetable Pot Roast with Persimmon, Hazelnut Salad

I felt like such a lucky girl when my parents came in town - we went to lunch and then to the best grocery store to pick up the remaining ingredients needed for our Thanksgiving meal then off to the wine club for a tasting and finally home for a comforting meal cooked by Derek. I had all of the fun while he was all alone slaving in the kitchen cooking for myself and my parents. To top it off, I didn't hear one complaint!!

And to top top it off - it was delectable.

Unfortunately, I was not around to supervise the cooking and catch what ingredients went into the meal so recipes are not applicable to this posting.

Persimmon and Toasted Hazelnut Salad with Citrus Champagne Vinaigrette


Pot Roast with Root Vegetables


Thank you Derek!

Tuesday, November 23, 2010

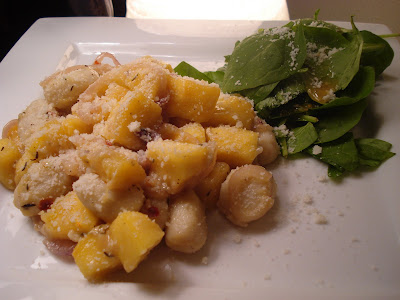
Gnocchi with Spicy Acorn Squash

This meal seems like an odd choice on my part. I've always stated that gnocchi is not my absolute favorite pasta. I see it as a plate full of dense tummy-fillers that sit like concrete in your stomach post-consumption. I prefer dishes that leave me satisfied but somewhat "light" afterward. However, when searching for a unique use for acorn squash, I came across a recipe that seemed intriguing: Mario Batali's Cavatelli with Spicy Acorn Squash. The game plan was to head over to the local Italian shop and pick up the pasta, throw together the quick dish, and enjoy a nice balance between "heavy" pasta and lighter squash.

I had never eaten cavatelli before - at least not to my knowledge. My only impression of it was the picture that accompanied the recipe.

So when I came to the Italian shop and did not find this cavatelli pasta, I had to come up with the next best alternative. The recipe states "cavatelli or shells" but - looking at the picture - those seem to be quite different. I see shells as fairly flimsy and light, likely overpowered by the dense acorn squash. In considering the next best alternative, I could only bring myself to consider gnocchi - freshly prepared, sitting in the refrigerator case at the store. Interestingly enough (unbeknown to me at the time), cavatelli and gnocchi are often compared or confused for each other. I came across this comparison in Wikipedia:

Cavatelli are sometimes confused with gnocchi, another form of pasta. The shapes are similar, however the main difference being in composition. Cavatelli are normally made of flour, semolina and water - they can also be made with ricotta cheese in the dough (principally by manufacturers in the United States); gnocchi are usually made from a softer dough consisting of potatoes and flour.

So I guess I am now satisfied with my substitution decision. With my other substitutions and modifications, the final recipe went as follows:

Gnocchi with Spicy Acorn Squash


Ingredients
3 tablespoons extra-virgin olive oil
3 large garlic cloves, thinly sliced
1/2 red onion, thinly sliced
1 teaspoon crushed red pepper
1 pound acorn squash—peeled, seeded and cut into 1/2-inch cubes
1 teaspoon dried thyme (ideally fresh, and add more - 1 T., we were out)
Salt and freshly ground pepper
10 oz (approx - 1 box) fresh gnocchi
1/2 cup freshly grated pecorino cheese, plus more for serving

Bring a large pot of salted water to a boil. In a large, deep skillet, heat the olive oil. Add the garlic, onion and crushed red pepper and cook over moderately high heat, stirring occasionally, until the garlic and onion are softened, about 5 minutes. Add the squash and thyme, season with salt and pepper and cook for 5 minutes, stirring occasionally. Cover and cook over moderately low heat, stirring occasionally, until the squash is tender, about 7-10 minutes.

Meanwhile, add the gnocchi to the boiling water and cook until al dente. Drain, reserving 1 cup of the pasta cooking water. Add the gnocchi to the squash mixture in the skillet, then stir in 1/2 cup of the pasta cooking water and toss gently to combine. Add the 3/4 cup of caciocavallo, season with salt and pepper and stir gently; add a little more pasta water if necessary. Serve the pasta right away, passing more cheese at the table.


I've opened my mind to gnocchi. I still stand firm in not wanting an entire plate full of the little dumplings, that would be too much. However, it's great for either a small appetizer portion (though a small portion would still probably fill you up too much to where you wouldn't enjoy your dinner - so maybe scratch that comment) or combined with other lighter elements to create a balanced dish. Acorn squash served as the lighter component to this meal. I also think some wilted spinach would be a great addition - adding that needed pop of color.

I would like to try the smaller gnocchi, the ones that we bought were fairly large, better eaten in two bites. If I feel adventurous, maybe I will try to make some on my own - I'm thinking sweet potato gnocchi.

Don't be surprised if you see that recipe come up in this blog within the next few weeks...

Overall, I loved the squash - you can't go wrong with acorn squash. And the pasta was actually good and added some nice substance and variation to the dish. I should also mention that the pecorino made the dish. A little goes a long way. It adds a fantastic saltiness and richness to the dish. After mixing in just a bit of cheese, the dish transformed into a seemingly "creamy" composition with a balance of salty, spicy, richness.

Monday, November 22, 2010

Ancho Spiced Pork Chops with Sauteed Brussels Sprouts and Mashed Sweet Potatoes

In the 9 days and nights that I had to fend for myself while Derek was out of town, I had seafood once, and meat once (turkey lunch meat...does that even count?). The rest was vegetarian. After 9 days, I was craving some real meat. For our first time back in the kitchen together - Derek was thinking fish...I had other ideas.

The fabulous Air Wick cinnamon-apple room freshener at my apartment inspired me to cook fall-flavors - comforting and hearty. A classic combination is pork and apples so some variation of this was what I set my sights on. Through normal creative banter, Derek and I came up with the final menu plan - Ancho Spiced Pork Chops with Sauteed Brussels Sprouts and Mashed Sweet Potatoes. My only task was the sweet potatoes, I guess I got off pretty easy.

Ancho Spiced Pork Chops

Ancho chili spice blend (ancho chili pepper, cinnamon, cumin, brown sugar, salt, pepper, cayenne, etc.)
Fresh pork chops (Derek chose Korobuta, I went for simple bone-in free range - much cheaper)

Liberally coat pork chops with spice blend. Let sit for 30 minutes to 1 hour. Heat EVOO in a pan over medium-high heat. Add the pork chops and brown each side, about 2 minutes per side. Place in a preheated oven at 375 and finish cooking until the internal temperature reaches 140 degrees.

Let pork sit for a few minutes before serving.


Sauteed Brussels Sprouts

2 pieces bacon
18 brussels sprouts (I didn't weigh them but I remember that's how many there were!)
1 shallot, sliced
1 garlic clove, minced
EVOO
1/2 tsp. cinnamon
1/4 tsp. cayenne pepper
1/4 cup chicken broth
1 apple, peeled and diced
1 tsp. apple cider vinegar
salt and pepper

In a saute pan over low heat, add the bacon and render the fat (slow cooking) - cook until the bacon is crisp and the fat has been rendered. Remove the bacon and set aside.

Reserve about 1 T. bacon fat and discard the rest. Add 1 tsp. oil and heat over medium heat. Add the shallots and garlic. Cook until the shallots are softened and translucent. Mix in the cinnamon and cayenne pepper. Meanwhile, prepare the brussels sprouts by cleaning and trimming the ends, removing any leaves that fall or look worn (this shouldn't be the case, but just in case they aren't perfect looking!). Cut into halves and add to the shallots. Add enough chicken broth to cover the bottom of the pan. Saute for about 7-8 minutes. Add the apple and apple cider vinegar. Cook for another 3 minutes. Season with salt and pepper.

Remove from heat and top with crumbled bacon.


Mashed Sweet Potatoes

2 small to medium (individual serving size) sweet potatoes
1/4 cup + 2 Tbsp. whole milk
1 T. butter
1 T. brown sugar
1/8 tsp. cayenne pepper
1/8 tsp. cinnamon
salt and pepper

Peel and chop the sweet potatoes into about 1 in pieces (for quicker cook time). Bring sweet potatoes to boil in a pot of salted water. Boil until tender, about 15-20 minutes depending on size of sweet potato pieces. Drain, and return to pot.

Meanwhile, in a small saucepan, bring milk, butter, and brown sugar to a simmer, stirring to combine; remove from heat. Add to drained sweet potatoes, add cinnamon and cayenne and mash just until smooth; season with salt and pepper.


While consuming this brilliant meal, I commented that I would be very happy to receive it in a restaurant. Sure, I'd probably never order it due to the sheer simplicity of the meal, but everything was very well executed. The pork was very juicy and tender (note - this not common of typical pork preparation). I think we can attribute the flavor and tenderness of the pork to the sheer quality of it. Derek's Korobuta pork cost about $10 for the single chop. Mind you, this is the "kobe beef" of pork - and you can tell when you taste it. The best way to describe the taste is that of a tender pork roast, full of rich, pork flavor. My pork chop, a natural, free-range what-not from the same butcher, came in at around $3 total. Though I knew the Korobuta would probably be superior to my meat selection, you can't argue the price difference. I was extremely surprised when I cut into my chop and came into contact with an extremely tender and juicy piece of meat. Sure, the flavor may not have been quite as rich as the Korobuta, but if you didn't try a bite of the Korobuta, you'd never know there was anything better out there. It was awesome.

As for the brussels sprouts, Derek is making them again in the same week for Thanksgiving. Yep! That's right, they're Thanksgiving worthy. I was originally thinking of doing roasted brussels sprouts for Thanksgiving but with the Turkey and dressing already taking up space in the oven, a stovetop preparation is perfect. And they were delicious. Honestly.

To round out the meal, my mashed sweet potatoes added not only a beautiful color to the plate, but offered a nice balance between sweet and savory. I didn't want dessert sweet potatoes and many preparations call for - butter, sugar, marshmallows, pecans, butter, sugar, butter, sugar....sugar...so I kept this dish simple with accents of sweetness (brown sugar and cinnamon) and spice (cayenne and black pepper) that served to highlight the natural flavor of the sweet potato - I couldn't get enough of them.

For this meal, I licked my plate clean.

Friday, November 19, 2010

Miso Vegetable Soup with Tofu Noodles

When I have a week at home alone and am left to cook just for myself, you can pretty much bet on the fact that I will be cooking tofu at some point. It is an inexpensive protein that I actually have developed a taste for and thoroughly enjoy. So when I was shopping at Real Food Company and came across tofu noodles, I was extremely intrigued and had to try them out. The commercial name for these noodles is Shirataki Noodles and here is the lesson for the day, Shirataki 101, an introductory course:

What are Tofu Shirataki Noodles?
Shirataki noodles tend to be a bit “rubbery”. Although this can be somewhat reduced by a short period of boiling, one food developer found that adding tofu to the shirataki produced a “tamer” texture. It also adds a bit of protein and carbohydrate. (1 gram protein and 3 grams carbohydrate per serving).

What is the health review?

LOW CARB - only 3g of carbs per serving
LOW CALORIE - 20 calories per 4 oz serving
NO CHOLESTEROL
NO SUGAR
GLUTEN-FREE
DAIRY-FREE
CONTAINS 10% CALCIUM
VEGAN
GUILT-FREE

So basically, looking at the "health review" one would think that these noodles are essentially tasteless and void of - well - anything! I'd somewhat agree but I have to give them credit - they really do fit the bill when wanting noodles without wanting the carbs from pasta. I wouldn't really recommend them to take the place of pasta in your everyday spaghetti and meatballs. However, in a noodle soup where the noddle isn't the primary component to the dish, it's a really great alternative and pretty interesting! Sure, it's a little bit rubbery, but can you really expect it to be as delicious as fresh spaghetti pasta?

I'd buy it again, but probably only serve it to my vegan friends who also have an appreciation for this type of food. For pasta purists, this is NOT for you.

My application for the noodles was the Asian inspired noodle soup. I did not follow a recipe as I hardly never do with my vegetable soups. I use the ingredients that I have and that seem to fit in with the soup theme. Here's my version of the Miso Vegetable Soup with Tofu Noodles

4 cups water
3 T. red miso paste
1 T. soy sauce
1 t. sesame oil
3/4 in. piece ginger, freshly grated
1 carrot, peeled and chopped (probably best to do matchsticks, I was lazy)
4 large shiitake mushrooms, cleaned and sliced
1 cup napa cabbage, shredded
2 cups spinach
1 package tofu noodles, drained and rinsed
Roasted Seaweed, mung bean sprouts, thai basil, and chili-garlic sauce for garnish

Heat the miso paste with water in a large pot. Once blended and fully incorporated, add the soy sauce and sesame oil. Add the carrots and cook for about 10-15 minutes, until they soften. Add the mushrooms, cabbage and tofu noodles. Simmer for another 2-3 minutes. Add spinach and stir until wilted.

Ladle soup into a bowl, making sure to get a good mix of broth, veggies, and noodles. Top with mung bean sprouts, shopped roasted seaweed, Thai basil (a generous amount), and chili garlic sauce or siracha, to taste.


This was good - not amazing. I wouldn't be WOWED if I were at a restaurant but I certainly would not send it back either. Technically, it was not perfect, but it fit the bill for a comforting Asian-inspired noodle soup. Just fine for me!

Wednesday, November 17, 2010

Fall Red Quinoa Salad

After making the stuffed acorn squash last week, and having the fantastic leftovers - I was really craving the dish again just a few days later. I purchased an acorn squash to make it again...but then realized that I was just cooking for myself and remembered how much food we had last week!! Thus I substituted butternut squash for the acorn squash since I had just picked a small one up at the farmer's market. It didn't have any garbanzo beans but that was OK, I figured I had enough ingredients to make this dish substantial. My vision was an israeli couscous salad with butternut squash and a filling mush like that of the stuffed acorn squash. It sounded so wonderful, I was thinking about it all day. You can imagine my sadness then when I realized that I only had a little bit of israeli couscous left at home and the ratio would simply be off if I used it as my grain. Luckily I had red quinoa on the bench and called it into play.

My dish turned into something quite different from its original inspiration but ended up being almost equally delicious - with the spices still coming from the original source.

Another key new element to this inspired recipe was persimmon. We had received two persimmons in our fruit/vegetable shipment and had not yet found a use for them. I figured the persimmon would add a touch of sweetness when sauteed in the savory spices. I took a risk - it paid off.

Without knowing exactly what I did - here's my best guess:

1 small butternut squash, peeled, chopped
1 tsp. brown sugar
EVOO
1/2 cup red quinoa
1 cup vegetable broth
1 carrot, peeled and chopped
1 celery rib, chopped
2 cloves garlic, minced
1/2 small onion, chopped
2 small persimmons, peeled and chopped
1/4 cup golden raisins, chopped
2 cups spinach
1.5 tsp cumin
1/4 tsp. cinnamon, divided
1/8 tsp. cayenne pepper
salt
pepper

Heat oven to 400 degrees. Toss butternut squash cubes with 1/8 tsp cinnamon, 1 tsp EVOO, and 1 tsp. brown sugar. Spread on a baking sheet and bake for about 15 minutes, until just tender.

Mix vegetable stock and quinoa together in a pot and bring to a boil. Cover and simmer on low for about 15 minutes until the liquid is absorbed (ratio for quinoa/liquid is about 1:2). Set aside.

While the butternut squash is roasting, heat EVOO in a pan. Add the garlic and onion and sweat for about 3 minutes over medium heat, stirring to make sure it does not brown. Add the carrots, celery and spices. Cook for another 7-10 minutes, until the carrot begins to tenderize. If you need to add a bit of liquid, throw in a little vegetable broth or water at this point. Add the persimmons and golden raisins. Saute for another 3 minutes. Add the spinach and roasted butternut squash. Stir until the spinach is just wilted. Season with salt and pepper.

Mix vegetable saute with the cooked quinoa. Stir to mix. Adjust seasoning if needed.


I think that's about spot on to what I did. I did add some liquid to the vegetable saute so it didn't burn and so it didn't dry out. Even though I was a bit bummed out that I wouldn't be eating my beloved israeli couscous, I was pretty happy with how this turned out. It still didn't wow me like my stuffed acorn squash did, but it was a healthy and hearty meal. I even had leftovers that I threw on top of a bed of spinach and ate cold.

It had sweetness (raisins, persimmons, cinnamon, carrots) and savory/hearty (quinoa, celery, spinach)-- ok so maybe it was sweeter than I thought, but that blends so well with cumin and cinnamon...so it was a pretty good blend. I would never serve this to guests because it isn't beautiful and isn't built to impress. But if I'm cooking just for myself and craving something healthy and interesting - it would certainly fit the bill.

Tuesday, November 16, 2010

Return to School Lunch for Dinner: Turkey, Cooler Ranch Doritos, and Avocado Spread Sandwich

Because the Giants won the World Series, a box full of Frito-Lay chips arrived at our office. Our company counterparts located in Dallas were so certain that their beloved Texans would hand defeat to the Giants, that they made a bet in favor of their team. Based on the ongoing party in San Francisco, it is quite evident that the Giants surpassed expectations and came home with the victory, and influenced the influx of "Texan" items (wine, pie, Frito-Lay chips) into our office.

Though I'm typically not too intrigued by processed chips, when I spotted the blue Cooler Ranch Dorito bag, I was brought back to a childhood favorite - stuffing crunchy/salty chips in between two slices of bread as an additional compliment to a sandwich. Glorious.

Coming off of the previous night's dinner or seared sea scallops with cauliflower puree and swiss chard, I thought: why not do a 360 and prepare one of the most elementary (literally) dishes possible. Thus, upon securing my little individual bag of Cooler Ranch Doritos, my anticipation for the evening meal grew and I felt like a little kid again.

Given that turkey is my go-to lunch meat, I selected this as the base of the sandwich (after all, I couldn't just have a dorito sandwich...could I?)

However, some nutritional value needed to be incorporated into the sandwich. Therefore the final lineup included:

- 2 slices of sprouted wheat bread
- Avocado spread (1/3 avocado + 1 tsp vegan mayo + 1 tsp lemon juice + 1/8 tsp. cumin + salt and pepper) mashed and mixed
- 5 slices of deli turkey meat
- 1/2 tomato, sliced
- 2 romaine lettuce leaves
- alfalfa sprouts
- Cooler Ranch Doritos

Pile everything in between the bread and you've got yourself and incredible, nostalgic sandwich. The only thing missing was the chocolate milk or juice box and a chocolate chip cookie (or in my case, a Little Debbie snack - I was notorious for those!)


This meal does not lend its way to a culinary critique...it is what it is...and I thoroughly enjoyed it :)

Seared Sea Scallops with Cauliflower Puree and Swiss Chard

It's oftentimes hard to be motivated to cook an "elaborate" dinner when you are just cooking for yourself. However, for me, Sundays are an exception to that trend and when I walk through the Farmer's Market - I can still get inspired to cook for one. Almost automatically, I knew I would be cooking scallops. It's pretty much a given. They're delicious and quick to cook. And, if done correctly, they are quite impressive.

My initial idea was to do a sweet potato puree under some type of seasonal scallop (think cinnamon, nutmeg, cloves...somewhere along those lines), and then have the scallop sit on top of a cut-out round of Asian pear that had been slightly sauteed in a butter and sugar mixture. In general - this would be a sweet dish as all components (scallops, pear, sweet potatoes) are naturally sweet. In the end, I persuaded myself to go another route but I'm still thinking about that possible combination!

The meal that I chose instead was along the same lines, and combined concepts from several different recipes. I had, for a long time, had a recipe in my files from Foodandwine.com that combined scallops, cauliflower, raisins, and capers, among other ingredients. Enthusiastic to get started with this meal - you can imagine my disappointment when I get home and realize that we no longer have that jar of capers - such a critical element! So I had to improvise and did so with partial success.

The dish had three main components:
1. Seared Scallops with Cauliflower, Golden Raisin and Pumpkin Seed Saute
2. Cauliflower Puree
3. Simple Swiss Chard

NOTE: These "recipes" are essentially for feeding 1 person. Me.

Seared Scallops with Cauliflower, Golden Raisin and Pumpkin Seed Saute

For the Cauliflower Saute:
1 tsp. butter
1/2 small shallot, minced
2 Tbs. golden raisins, chopped
1/4 cup small cauliflower florets
1 Tbs. pumpkin seeds, roasted with EVOO and salt
1/4 cup chopped parsley
1 tsp. lemon juice
salt
pepper

Heat butter in a small frying pan over medium heat. Add the shallot and sweat for about 3-5 minutes, until translucent. Add the raisins and cauliflower pieces. Saute for another 5-7 minutes without stirring so that the cauliflower florets can slightly brown (if anything seems to be burning, add a little more butter...or even a bit of liquid - such as broth - could be OK).

Add the pumpkin seeds, parsley, and lemon juice. Mix well and season with salt and pepper. Set aside.

Scallops
4 fresh scallops, cleaned and dried
salt
pepper
butter
aged balsamic vinegar

Heat butter in a skillet. Season scallops with salt and pepper (both sides!). Add scallops to the skillet and cook for about 90 seconds per side (depending on size and your taste for how done you like you scallops - my opinion? the rarer the better).

Transfer scallops to serving plate and top with Cauliflower Saute. Add a few drops of aged balsamic vinegar alongside the scallops (not featured in pictures).


Cauliflower Puree

1/2 small head of cauliflower, florets separated
1 tsp. butter
1/6 cup (approx.) milk
salt
white pepper
nutmeg, freshly grated
paprika (optional)

Boil cauliflower florets until softened, about 10-15 minutes. Transfer to a blender or food processor and add the milk and butter. Blend until the mixture forms a smooth puree. Season with salt, white pepper, and freshly grated nutmeg, to taste.

To serve, spread on a place, leaving a small well for the scallops. Sprinkle with paprika.


Swiss Chard

1/2 Tbsp. Butter or EVOO
1 small shallot, thinly sliced
1 garlic clove, minced
5 leaves swiss chard, stemmed, cleaned, and chopped
1/4 cup vegetable broth
1 tsp. lemon juice
salt and pepper
pinch cayenne

Heat butter and/or EVOO in a large pan over medium heat. Add the shallot and garlic clove. Cook until translucent, stirring frequently. Add the swiss chard and vegetable broth and cook for about 5 minutes. Once wilted, stir in the lemon juice and season with salt, pepper, and a pinch of cayenne pepper.


Honestly, I think this meal looked a lot prettier than it tasted. It was certainly good, don't get me wrong, but it didn't have the WOW factor that I had hoped for - maybe because I was missing something from my meal - Chardonnay.

The scallops were missing something. Perhaps they were underseasoned or not browned well enough - I couldn't put my finger on it. They were definitely not overcooked so that wasn't the issue. Again, they were tasty but not incredible. I wish there were capers in the saute topping - that was my fault though.

Issue with the cauliflower puree? Hmm the flavor was actually really good - it could have probably used more butter to have a richer taste, but I think there was a good enough balance. I also added more milk than i should have so they were a little runny - I adjusted the recipe to account for that.

The swiss chard was actually my favorite component. It was simple and delicious.

Overall I was pretty happy with myself for cooking solo on a Sunday night. I enjoyed myself and had a tasty meal to top off a fabulously warm San Francisco day - celebrated by the most incredible run across the Golden Gate Bridge - just glorious!!

Thursday, November 11, 2010

Gouda and Asian Pear Grilled Cheese with Roasted Beet and Spinach Salad

This post is probably more for show than for content. Anyone knows how to make a decent grilled cheese - unless you burn it or under-grill it - if you throw something tasty in between two slices of buttered bread and grill it on both sides to produce melty, oozey cheese - it's probably going to be adequately satisfying.

That being said, this was not the best grilled cheese that I have had in my life. My recent constant craving for crisp and juicy asian pear led me to this sandwich concept. I thought the crunch pear would pair wonderfully with a heavier, warm melted cheese. And gouda, in my opinion, is a pretty good cheese (though I still am partial to smoked gouda,I know, not the most sophisticated of cheese varieties).

The simple construction of the sandwich was as follows:

4 slices of fresh sourdough bread
butter
sliced gouda cheese
1 small asian pear, peeled and sliced

Butter the outside of each slice of bread.
Top unbuttered layer with cheese and pear.
Top with other slice of bread - butter facing out.
Grill on a panini press or weighted skillet (see our version below) until each side is browned and cheese is melted (flip halfway through if using a skillet)

Note: our ghetto "panini press"


Everything-but-the-kitchen-sink Panini Press

The concept of the sandwich was on-point, in my opinion. I think were we went slightly wrong was in the thickness of the asian pear slices (which I cannot take credit for...I would have sliced them much thicker). They were sliced far too thin and really got lost when mixed with the cheese. Even though the slices were layered, the fact that they were thin meant that we lost the definitive crispness that distinguishes the asian pear and would have been an asset in the recipe.

To accompany the grilled cheese we made a simple roasted beet salad with spinach, roasted beets, and the fresh cow's milk farmer's market cheese. Top with some salt and pepper and dress with an apple cider vinaigrette.

Undressed:


Dressed:


The salad, obviously, was tasty - you can't go wrong with beets, spinach and a good crumbly cheese. I also topped mine with some dried cranberries to add some additional sweetness.

Monday, November 8, 2010

Bison Italian Wedding Soup

Anytime Derek says he is sick, or I'm feeling a little under the weather, I find it a perfect opportunity to make soup for dinner. I just love how comforting a good bowl of hot soup with warm crusty bread is. So when I heard word that Derek was feeling a bit under the weather - my recommendation? Soup! And being the nice girlfriend I am (most of the time), I let him choose exactly what he was in the mood for.

His selection? Italian Wedding Soup.

Interesting. I've never made it before. Not being a huge fan of meat in my soup, Italian Wedding is not one that I eat frequently. However, on this cold (for San Francisco at least) fall night, it seemed to fit the bill just perfectly.

To stray from any sense of standard soup creation, Derek decided he wanted to use bison for the meat. Fine with me. So I looked up "Bison Italian Wedding Soup" and sure enough, it was out there! I picked up the first recipe that I saw and sent it over to Derek for approval.

And because he was not in fact deathly ill, I left him to do the cooking (I had cooked the previous two nights...his turn).

Bison Italian Wedding Soup
3 servings, all completed by 2 people


I swear, soup pictures never look good. Oh how I desire a good camera...

Ingredients:
1/2 egg, beaten
1/2 teaspoon fresh fennel, grated
1/2-1 teaspoon fresh basil, chopped
1 garlic clove, minced
1/2 teaspoon salt
1 teaspoon black pepper
1 tablespoon olive oil
1 slice of sourdough bread, crust removed, torn into pieces
1/2 pound ground bison
1 quart organic chicken stock
1 carrot, peeled and diced
1 celery stalk, sliced
1/3 cup orzo pasta
3 cups spinach, chopped and packed
* grated parmesan to pass, optional

Mix eggs, seasoning and olive oil together.
Add bread and ground bison and mix thoroughly.
Form into small meatballs, making about 20.
Place on baking sheet and bake meatballs in a 425* preheated oven, until browned.

In stock pot on stove top over medium high heat, head some butter and add the carrot and celery. Let cook until the vegetable begin to tenderize. Add the chicken stock and bring to a boil.
Add orzo, and cook until pasta is tender, about 8 minutes.
Reduce heat and add meatballs and juices from meatball pan to the stock. Bring to a boil.
Add spinach and cook for 2 minutes
Ladle soup into bowl and pass with grated parmesan.

Serve with crusty bread.

Ahhhh so comforting. The meatballs had so much flavor and I actually enjoyed them in my soup. Derek substituted fresh ingredients to take the place of the dry ones that the recipe called for and we did not own (fennel, basil) - and it worked out really well. We finished the pot so I guess that proves it was a tasty meal.

Moroccan Stuffed Acorn Squash with Apple Braised Greens

I had seen this recipe a few years ago and now, after having finally made it, I wonder, "why didn't I make this sooner?" What a Katie meal! It covers most all of the components of a typical meal that I produce or enjoy:

- Vegetarian or Seafood (check - vegetarian for the most part, no meat at least...)
- Strong vegetable presence (check)
- Middle Eastern spices or Asian flavors (check)
- Touch of sweetness (check)
- Not overly difficult (check)

Growing up I had enjoyed acorn squash frequently throughout the winter as a side dish, simply roasted with a pat of butter, brown sugar, and cinnamon. Essentially, it was a healthy dessert. The squash is naturally sweet and comforting and when you add the butter and sugar and cinnamon...well, you've got dessert! Not a surprise that this was served for dinner considering my family ate "Fruit Pizzas" for dinner...and then had dessert. To this day, I give my parents a hard time for that. Sugar cookie dough, cream cheese frosting, and sliced fresh fruit hardly constitutes and acceptable side dish. However, we are the Sugermeyers and have sugar built into our genes, it's our natural fuel.

This recipe was my chance to do something a little bit more savory with my beloved acorn squash. And given the size and shape, it is the perfect little vessel for stuffing.

Moroccan Stuffed Acorn Squash
recipe adapted for 2 people

1 tablespoons brown sugar
1 tablespoon butter, melted
1 large acorn squash, halved and seeded
1 tablespoons olive oil
1 clove garlic, chopped
1 stalks celery, chopped
1 carrots, chopped
1 cup garbanzo beans, drained
1/4 cup raisins
2.5 tsp tablespoons ground cumin
1/4 tsp. cayenne pepper
1/4 tsp. cinnamon
salt and pepper to taste
1/2 cup chicken broth (or vegetable broth if you want pure vegetarian)
1/2 cup uncooked couscous (whole-wheat)

Preheat oven to 350 degrees F (175 degrees C).

Arrange squash halves cut side down on a baking sheet. Bake 30-40 minutes depending on the size, until tender. Dissolve the sugar in the melted butter. Brush squash with the butter mixture once it is out of the oven.

While the squash is cooking, heat the olive oil in a skillet over medium heat. Stir in the garlic, celery, and carrots, and cook 5 minutes. Mix in the garbanzo beans and raisins. Season with cumin, cayenne, cinnamon, salt, and pepper, and continue to cook and stir until vegetables are tender.

Pour the chicken broth into the skillet, and mix in the couscous. Cover skillet, and turn off heat. Allow couscous to absorb liquid for 5 minutes. Stuff squash halves with the skillet mixture to serve.


So this dish actually ended up being four servings. It was so strange for me to stop literally mid-way through my squash and say "I'm full!" but I was - so I stopped (this is opposed to my normal plate-clearing habits). So bonus, there were leftovers. The squash itself is a really filling food, then add whole wheat couscous and chickpeas and you've got a pretty hearty meal! It's fabulous...that's all I need to say about it. Nothing fancy, just good, simple home cooking.

The accompaniment to the squash (though I realize now it definitely did not need one as it was soooo filling!!) was apple "cider" braised greens. "Cider" is in quotations because I used standard apple juice picked up on my home from the gym from the gas station on my block. Ideally, I would have used apple cider.

Apple Braised Greens

2 pieces of bacon
3 cloves garlic, thinly sliced
1 shallot, thinly sliced
1 bunch of leafy greens (I used rapini), cleaned an torn into manageable pieces
1 cup apple cider
1 T. apple cider vinegar
1 apple, peeled, cored, and diced (I recommend Granny Smith)
salt and pepper

In a large pan, cook the bacon over medium low heat until the fat has rendered and the meat is crispy. Remove the bacon but keep the grease in the pan. Add garlic and shallot and cook 30 seconds to 1 minute or until golden, stirring constantly. Add the greens, cider, and. vinegar, stirring to wilt greens.

Reduce heat to medium. Cover sauce pot and cook greens 10-15 minutes (depending on the kind of greens you use). Stir in apples; cook, partially covered, 10 minutes longer or until stems are very tender and most of liquid evaporates, stirring occasionally.

With slotted spoon, transfer to serving bowl. Sprinkle with reserved bacon, crumbled.


So the greens don't look beautiful - perhaps they cooked a little bit too long and I could have diced the apple finer. Regardless of looks, however, the dish was really tasty. Even with standard apple juice as the liquid - I can only imagine how cider would kick it up a notch!


LEFTOVERS? Remove the filling from the squash, set aside. Scoop out the flesh of the squash and cut into bite sized pieces. Mix it all together. Done! I had it for lunch today...and two days ago...and it was heavenly.

Friday, November 5, 2010

Chile Glazed Halibut and Tomatillo Avocado Sauce with Roasted Corn and Butternut Squash Tamales

I love it when we have guests in town - it gives us the perfect opportunity to entertain and have another person sit at the table and dine with us! It also means that Derek is taking the lead to ensure an "impressive" mean. On the downside, this also means that I'm the one doing the dishes, typically solo (not that this is abnormal or anything). It's kind of like going back to my childhood when my parents cooked and took care of the dishes for the most part (thank you Mom and Dad) but then on holidays (Thanksgiving, Christmas...) it was suddenly time for my sister and I to step up and do the dishes...lots and lots of dishes. When it rains it pours I guess. And just so you know, at some point in my childhood I did start contributing to the dishes on a nightly basis and designated myself in the role of "washer" which I still maintain to this day.

Derek had mentioned something about making a tomatillo avocado sauce as a main inspiration for the meal so being my little researcher self - I set out to find the perfect recipe that included this sauce. My search lead me to the following Epicurious recipe - link found HERE

Chile Glazed Halibut and Tomatillo Avocado Sauce

Note: I made the glazed with a few modifications. The following reflects the known changes to the recipe made for three servings.

Glaze
4 tablespoons fresh orange juice
2 tablespoons honey
1 1/2 teaspoons minced canned chipotle chiles*
1 garlic clove, coarsely chopped
1/4 teaspoon ground cinnamon

Sauce
1 large avocado, halved, pitted, peeled
2 medium tomatillos (about 4 ounces), husked, rinsed, coarsely chopped**
1/4 cup fresh orange juice
1/4 teaspoon (or more) hot pepper sauce

Fish
3 5-7 ounce halibut fillets (each about 1 inch thick)
1/2 orange with skin, cut lengthwise in half, thinly sliced crosswise
Ground cumin
Salt and Pepper


For glaze:
Mix all ingredients in blender until smooth. Season with salt and pepper.

For Sauce:
Combine all ingredients in blender; blend until smooth. Do ahead: Can be made 2 hours ahead. Cover; let stand at room temperature.

For fish:

Prepare barbecue (medium heat)(we don't have one so we used a grill pan and covered it with a pot...a little ghetto but it worked). Make crosswise slits in each fillet, cutting to within 1/4 inch of bottom and spacing slits about 3/4 inch apart. Brush glaze over top and into slits. Place orange slices in slits. Sprinkle fish with ground cumin, salt, and pepper. Place fish, orange side up, on grill; cover and cook until fish is opaque, about 8 minutes. Using wide spatula, carefully transfer fish to platter. Let rest several minutes. Spoon avocado sauce onto plates, spreading slightly. Arrange 1 fillet over sauce on each plate and serve


For the side dish we wanted to follow the quasi-Southwestern theme and remembered how delicious the tamales were that we had made a few weeks back. They were seen as the perfect single side dish as they incorporated starch (masa) and vegetables (butternut squash and corn).

I do not have the precise recipe, nor did I meticulously watch the preparation of the tamales. However, to make something similar, I would recommend following a standard tamale recipe and adding the following ingredients for the finning:

1 small butternut squash, roasted (seasoned with EVOO, salt, pepper, and cinnamon)
1-2 leeks
1 ear of corn, kernels removed
1 garlic clove
EVOO/butter
salt/pepper
cayenne (pinch)

Saute up the leeks and garlic in EVOO and butter. Add the roasted corn after a few minutes. Saute over low to medium heat so as to not burn the garlic. When soft, add the diced butternut squash (best to dice before roasting, Derek roasted first so cutting it was difficult).

Add as the filling to the masa dough in the soaked corn husks.

Place in a steamer and steam for about 30 minutes.


Carefully remove. We served the tamales out of husk but they can be a good presentation detail - probably best for larger tamales like Bobby Flay serves at Mesa Grill.

I thought the tamales would need something to tie it all together so I came up with the brilliant idea of making a lime crema to accompany them:


It was simply sour cream, juice of one lime, chopped cilantro, and salt. That's it - all mixed together and it was really key in the success of the tamales.


I was so hungry by the time this meal was on the table that I'm sure it would have tasted delicious even if it were not inherently delicious. However, it was...so that was a bonus. I could not get enough of the tomatillo avocado sauce. That is just an wonderful combination of flavors - subtle but perfectly blended. Prepared with some hot sauce to add a little kick - it was great. And the fish was really nice. I used less honey than the recipe called for. I also forgot about it in the microwave so it was liquified when brushed on the fish - therefore, it wasn't much of a "glaze" but rather a marinade (without the marinating process). Regardless, flavor was there even if glazing effect was not.

And the tamales, oh the tamales. I wish I didn't like them as much as I do. They are best made with real lard, yes LARD, but that's what makes them so darn good!! Mind you, Derek always uses less lard (what a terrible word) than it calls for, but it's still there. Whatever - it's the medium for getting my vegetables so it's fine, right?

I can justify anything.

Served with one of my favorite decent priced wines: Beringer Alluvium Blanc. It runs about $17 but its a part of our wine club so we get 20-30 percent off...so it's completely reasonable and so fabulous. It has some of the richness of a Chardonnay and Viogner but then the Sauvignon Blanc comes in and cuts it with some acid.

Gosh...my mouth is watering...is it 5 PM yet?

Wednesday, November 3, 2010

Farmer's Market Pasta with Tomatoes, Arugula and Fresh Cheese

Ever since I discovered the fresh pasta at the Farmer's Market - I've been hooked! I'm not a huge pasta person and usually get sick of it in large quantities. However, this stuff is just out of this world!! It's a totally different product. This Sunday we decided to pck you the whole-wheat fettuccine. It's also vegan, I don't know if that is all that abnormal, but it does mean that it was made without any eggs - and is still totally fabulous.

Our direction for the pasta was simple - all Farmer's Market picks: arugula, cherry tomatoes, fresh cow's milk cheese...voila!

Speaking of the cow's milk cheese - this was a purchase that we had been talking about for weeks now. Every Sunday we go and have a little sample of the cheeses - all of which are fabulous - all made by Nicasio Valley Cheese Company. There is one in particular, however, that really stands out. It's the "Foggy Morning" cheese that I was told was only 3 days old when we bought it. That's FRESH! Their website describes the cheese as:

Foggy Morning : A fresh cow’s milk cheese. Extremely versatile, it’s delicious on its own, or matched with pasta, salads, pizza, olive oil and cracked pepper, fruit or jams.

...it is heavenly. It kind of has the burrata melt-in-your-mouth effect.

Given that it is such a delicate cheese, we just added it on top after plating, it would have melted and gotten lost otherwise.

This recipe would certainly meet the criteria of Rachael Ray's "30 Minute Meals" show.

Farmer's Market Pasta with Tomatoes, Arugula and Fresh Cheese

10 oz. fresh whole-wheat fettuccine
2 Tbsp. quality EVOO
2 garlic cloves, thinly sliced
1 pint cherry tomatoes, mixed colors (large tomatoes sliced in half)
5 cups arugula
fresh cow's milk cheese
lemon juice
salt
pepper

Heat oil in a pan over medium low heat. Add the garlic and let cook slowly at the low temperature, making sure the garlic does not burn. After about 8-10 minutes the garlic should be slightly golden and thoroughly infused throughout the oil. Add the tomatoes and cook for another 5-7 minutes or until they become tender and begin to POP.

Meanwhile, prepare pasta according to package directions. If using fresh pasta, it should be about 3 minutes cook time in salted boiling water. Drain and set aside.

Add the arugula to the tomato mixture and stir until the arugula just begins to wilt. Add the pasta to the tomato mixture, making sure to evenly incorporate the tomatoes within the pasta strands.

To serve, place a mound of pasta and tomatoes/arugula on a plate. Top with chunks of the fresh cheese (to taste). Sprinkle with fresh lemon juice, salt and pepper.


This went nicely with a Sauvignon Blanc!

How simple was that! Another example where fresh, quality ingredients is KEY!