Looking back at my recent posts - I realized that, with the exception of some baking - I have completely slacked off in the cooking arena for the past few weeks. I don't know it has been apathy or Derek's eagerness to cook, or just a busy life, but cooking has not been on top of my to-do list.
Even for the first two days of Derek's absence (in LA for a week), I opted for bagged salad mix and boxed soup. Finally, last night, I took baby steps toward re-familiarizing myself with the kitchen and crafted a simple yet fantastic "Katie" meal with the primary goal being to use up some of the collard greens that we had received two shipments in a row.
When I think of collard greens, I immediately envision a Southern dish laden with bacon or ham hock and cooked down until it hardly resembles a green vegetable. I can take this as a side dish, maybe, but it doesn't stand out as a main dish - what I had set out to find. I browsed through my go-to sites: Food and Wine, Epicurious and Food Network before stumbling across the "winner" found on Saveur.com: Collard Greens Salad with Peanut Vinaigrette. Link to the original recipe found HERE. Perfect!
With some tweaking based on the ingredients I had on hand and what I wanted from the salad, I broke my no-cooking streak and turned out a fabulous variation of collard greens.
Collard Greens Salad with Peanut Vinaigrette and a Fried Egg
serves 2
1/2 cup raw or lightly salted peanuts
1/4 cup grapeseed oil
1 tsp. paprika
1/4 tsp. hickory smoked salt
Kosher salt, to taste
2 tbsp. apple cider vinegar
1 clove garlic, smashed and minced into a paste
1/8 cup red onion, minced
Freshly ground black pepper, to taste
pinch cayenne pepper
1 medium carrot, peeled and shaved lengthwise into thin ribbon using a peeler
1 bunch collard greens, stemmed and thinly sliced crosswise
1⁄4 cup loosely packed cilantro leaves
2 fried eggs
1. Heat oven to 325˚. Toss together peanuts, 2 tsp. oil, paprika, and salt on a baking sheet and bake, tossing occasionally, until golden brown, about 15 minutes. Transfer peanuts to a rack and let cool. Coarsely crush peanuts and divide between two bowls; set one bowl aside. To one bowl of peanuts, add remaining oil, vinegar,
garlic, and shallots and whisk to combine; add cayenne and season with salt and pepper and set vinaigrette aside.
2. In a large pan, heat about 1 tsp EVOO over medium heat. Add the collard greens and carrots. Cook, stirring often, for about 3 minutes, just long enough to heat the mixture and slightly wilt the collard greens. Add about 2-3 Tbsp. of the dressing and mix thoroughly. Season to taste with addition hickory smoked salt and pepper. Cook for another minute or two. Remove the collard greens and carrots from the heat and plate. Drizzle some more of the vinaigrette over top and garnish with reserved peanuts and cilantro. Serve with a side of fried egg, salted and peppered.
So good I made it the next night with the leftover vinaigrette and peanuts...so easy to prepare and so delicious...
Friday, February 25, 2011
Friday, February 18, 2011
Ad Hoc Chicken and Dumplings
When Derek says he wants to make chicken and dumplings, I immediately go into my memory box and pull out one of my favorite childhood comfort foods. A chicken soup with carrots and celery, only slightly thickened, with large puffy flour dumplings cooked right in the soup. The dumpling recipe, passed down from my grandma, is simple perfection:
Grandma’s Dumplings
2 cups all-purpose flour
1 teaspoon salt
4 teaspoons baking powder
3 tablespoons shortening
1/3 cup milk
2 eggs
Mix together the dry ingredients. Cut in the shortening. Add the milk and eggs. Drop onto boiling soup and cover pot while the soup continues to boil for 15 minutes.
Easy enough!
However, it's no surprise that Derek was talking about a completely different creature when he spoke of chicken and dumplings. Leave it to Thomas Keller to complicate one of the most simple comfort foods!
Ad Hoc Chicken Soup with Dumplings
slightly adapted and scaled down to feed 2
1/2 tbsp butter
1/2 cup thinly sliced carrots
1/2 cup coarsely chopped celery
1/2 cup coarsely chopped onion
1/2 cup coarsely chopped leeks
salt
Melt the butter over medium heat in your stock pot and add the carrots, celery, onions and leeks. Place a cut out circle of parchment paper on top, reduce the heat and cook for 30-35 minutes, stirring occasionally.
When the vegetables are done, add the chicken stock and simmer for about 30 minutes, then strain the soup base into another pot and discard the vegetables.
Dumplings
1/4 cup water
2 tbsp butter
1/2 tsp and 1/4 tsp salt
1/3 cup all purpose flour
1/2 tsp Dijon Mustard
1 large egg
1/2 tablespoon finely chopped flat-leaf parsley
Fill a large pot with salt and water and bring it to a simmer.
Combine the 1/4 cup water, butter and 1/2 tsp salt in a medium saucepan and bring it to a simmer over medium-high heat. Add the flour all at once, reduce the heat to medium and stir rapidly. The dough will come together in a glossy ball. Continue to cook the dough for about 4-5 minutes, stirring constantly. A thin coating of dough will form on the bottom of the pan.
Transfer the dough to a stand mixer and add the mustard, 1/4 tsp salt and mix to incorporate and release some heat. With the mixer on the lowest speed, add the egg and beat until it is completely incorporated. Add the flat-leaf parsley and stir in. If you don’t have a stand mixer, you can do this all by hand, it will just take longer for the egg to mix into the dough.
Shape the dumplings into quenelles using two soup spoons to scrape the dough into oblong football shapes or just drop into the simmering water. Once the dumplings rise to the surface, cook them for 5-6 minutes to ensure that they are cooked. Cut one open to make sure. Set aside.
1 qt chicken stock
3/4 cup peeled celery diagonally sliced into 1 1/2 inch long pieces
3/4 cup carrots, cut into quarters then diced into bite sized pieces
1/2 tsp honey
1 bay leaf
1 sprig of thyme
1 small garlic clove, crushed, skin on
salt and pepper
roux – 4 tbsp butter, 1/4 cup + 1 1/2 tbsp flour (we cut this down by a little more than half)
1 cup cooked, shredded chicken
1/8 cup chopped chives
Melt the butter in a small saucepan over medium heat. When it is nearly melted, whisk in the four and cook, whisking constantly and adjusting heat as necessary so the roux bubbles but does not brown, about 3 to 4 minutes. Set aside to cool.
Blanch the celery briefly and put in an ice bath. Cover the carrots with water and add the honey, bay leaf, thyme, garlic clove and salt and pepper. Simmer for about 4-5 five minutes, drain and set aside.
Bring the soup base up to a simmer and whisk in the roux a little at a time until the soup is thick enough to coat the back of a spoon. Simmer and skim for 30 minutes. Season to taste and add 1 tsp. champagne vinegar (we used white wine as we are out of champagne) and stir in chopped chives, reserving some for garnish.
Prepare each serving bowl with a portion of chicken, celery, carrots, and dumplings.

Pour the soup into the dumplings, chicken, carrots, celery; garnish with chives.

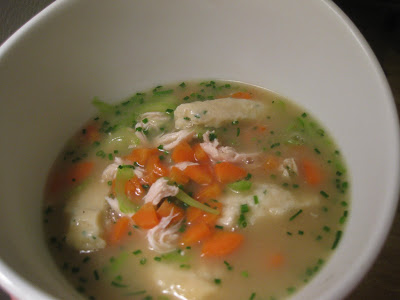
As you can see, no fluffy dumplings here and it's quite a bit more composed than what I grew up with. However, the mix of flavors was really fabulous. The mustard in the dumplings (essentially potato-less gnocchi) really brought a nice complexity to the otherwise simple flavor of the dish. The vegetables were not cooked down to a point of soft texture but rather, were quite "al dente." Derek said that he would have like the carrots cooked just a few minutes more since a crunchy vegetable isn't ideal in a soup - though it was interesting.
We also wish that there had been more broth - it was good and we were left wanting more. I especially liked that we did not thicken the broth up as much as the recipe called for. In the cookbook images, it seems as though the broth is more like a gravy. While it may have been equally as good - or even better - I voted for a healthier more soup-like texture to the dish.
For all of the time and effort of this dish, I'd probably still keep it second to my typical, easier, chicken and dumplings. However, for guests or a weekend that we have some time to prepare it, this was certainly a unique variation on a classic, comforting dish.
Wednesday, February 16, 2011
Seared Scallops with Cauliflower, Capers and Raisins
When we decided to pick up some scallops at the Farmer's Market - this recipe immediately popped into my head as it have been stored in my "to-make" recipe file for quite some time. The ingredients and preparation are simple - perfect for a weeknight meal.
Seared Scallops with Cauliflower, Capers and Raisins
original recipe HERE
INGREDIENTS
1/2 small head of cauliflower, cut into small florets (4 cups)
1 tablespoon extra-virgin olive oil
12 jumbo scallops (1 1/2 pounds), side muscle removed
Salt and freshly ground pepper
2 tablespoons unsalted butter
1/4 cup chopped roasted almonds, preferably marcona
2 tablespoons drained small capers
2 tablespoons golden raisins
2 tablespoons balsamic vinegar
1 tablespoon chopped flat-leaf parsley
DIRECTIONS
Bring a medium saucepan of salted water to a boil. Add the cauliflower and boil over high heat until just tender, 3 to 4 minutes. Drain, shaking off the excess water.
In a large skillet, heat the oil until shimmering. Season the scallops with salt and pepper; add to the skillet in a single layer and cook over high heat until golden and crusty, about 2 minutes. Turn the scallops. *Add the butter, cauliflower, almonds, capers and raisins and cook undisturbed until the scallops are white throughout and the cauliflower is lightly browned in spots, about 1 minute longer. Add the balsamic vinegar and stir gently to coat. Transfer to plates, garnish with the parsley and serve.
*At this point we switched up the recipe a little bit. We wanted to get a decent crust on the scallops (though didn't completely achieve it) so we decided it would be best to cook the scallops separately so the pan didn't get crowded - leading to "steaming" the scallops rather than caramelizing them. So we cooked the cauliflower, almonds, capers, and raisins in their own pan and then composed the dish.
PRESENTATION #1 (akin to the recipe presentation

PRESENTATION #2

What a disappointment - no, not the recipe - but the scallops! Something was seriously wrong with them! Though they smelled fine and were only two days old, they were completely bitter! If I had been at a restaurant there is no way I would have eaten them - but I was at home, having already paid $6 for my four measly scallops, and hungry - so they were consumed, but not enjoyed. It wasn't as if the scallops were rotten, both Derek and I were pretty sure they were not because of the assumed freshness of the scallops and the lack of odor - but never before have I had a bitter scallop! How disappointing!
After research, Derek found a few different reasons for the bitterness ranging from being packed in a specific preserving liquid to being at the ALMOST turning point. Because we maintain the freshness of the scallops (we were told they were picked on Saturday and shucked on Sunday AM) we suspect the little bit of liquid in the storage bag was the perpetrator. We'll have to talk to our fish guy next time we are at the Farmer's Market....
Bitterness (literal and figurative) aside, the recipe was fine - nothing too special, but generally nice. The actual dish took only minutes from start to finish - a true under 30 minutes meal - that gives it bonus points. But in general, it was just a little bit underwhelming - though that's not to say I won't make it again and jazz it up a bit.
Tuesday, February 15, 2011
Cupcake Wars: Carrot Cake vs. Red Velvet
I didn't think I would see the day that Derek would ask me if I wanted to do a cupcake war. Maybe it was due to the fact that I always make him watch that show on the Food Network. For some reason, despite the corny comments and staged conversations and drama, I can't get enough of Cupcake Wars! However, I think the real reason Derek brought up the enticing idea of a cupcake war was to make up for his timing flub causing us to miss the baking class (given to me as a Christmas gift) that we were supposed to attend that day. Unfortunately the class credit was lost and my excitement for learning how to bake the perfect pie crust was crushed with it.
So option number two - cupcake wars - would have to fit the bill for the day. In reality, this is a very tough challenge considering our lack of baking resources in our kitchen....and then we didn't start until 10 PM, so let's just say we were having to eat cupcakes well into the night/early morning - not quite the best thing to have right before bed, but fun nonetheless.
I selected Red Velvet for my cupcake. Cliche - especially for anyone who has seen Cupcake Wars - but I had personally never made them and really hadn't even eaten one before - at least not that I can remember. Additionally, the next day was Valentine's Day so a red cupcake just seemed to fit the bill.
Derek's choice obviously was limited to three options as Ad Hoc only features three cupcakes and Derek wouldn't dare venture to another source!! The options were White, Chocolate, or Carrot Cake. After first selecting chocolate but not being able to find the right "alkalized chocolate" at Whole Foods - Derek switched to Carrot Cake - one of my top 3 favorite flavors. At this point, I had already concluded that I would be voting for Derek's cupcake over mine for the simple fact that I find Carrot Cake irresistible - if executed correctly, of course.
I went first in the kitchen since I wanted to quickly get mine in and out of the oven, thinking about how I need to just go to bed with work looming early the next morning. After deliberation, I selected the red velvet cupcake recipe from JoyofBaking.com - crossed my fingers, and hoped it would work out.
Katie's Entry:
Red Velvet Cupcakes
source: http://joyofbaking.com/RedVelvetCupcakes.html#ixzz1E43wJtfn
1 1/4 cups (125 grams) sifted cake flour
1/4 teaspoon salt
1 tablespoons (10 grams) regular or Dutch-processed cocoa powder
1/4 cup (57 grams) unsalted butter, at room temperature
3/4 cups (150 grams) granulated white sugar
1 large egg
1/2 teaspoon pure vanilla extract
1/2 cup (120 ml) buttermilk
1 tablespoon liquid red food coloring
1/2 teaspoon white distilled vinegar
1/2 teaspoon baking soda
Red Velvet Cupcakes: Preheat oven to 350 degrees F (175 degrees C) and line 12 muffin tins with paper cupcake liners.
In a large bowl sift together the flour, salt, and cocoa powder.
In the bowl of your electric mixer, or with a hand mixer, beat the butter until soft (about 1-2 minutes). Add the sugar and beat until light and fluffy (about 2-3 minutes). Add the egg and beat until incorporated. Scrape down the sides of the bowl. Add the vanilla extract and beat until combined.
In a measuring cup whisk the buttermilk with the red food coloring. With the mixer on low speed, alternately add the flour mixture and buttermilk to the butter mixture, in three additions, beginning and ending with the flour.
In a small cup combine the vinegar and baking soda. Allow the mixture to fizz and then quickly fold into the cake batter.
Working quickly, divide the batter evenly among the 12 muffin cups and smooth the tops with an offset spatula or the back of a spoon. Bake in the preheated oven for approximately 18 - 23 minutes, or until a toothpick inserted in the center of the cupcakes comes out clean.
Cool the cakes in their pans on a wire rack for 10 minutes and them remove from pan. Let cool completely before frosting. Either spread the frosting with a knife or offset spatula, or use a large 1M Wilton open star decorating tip to pipe the frosting.
Cream Cheese Frosting: OK I cheated in this arena. Not because I was lazy but because I had been lazy about a week ago when I made mini brownies decorated with football lacing made of frosting, store bought cream cheese frosting to be exact. With about half of the container left sitting in my refrigerator, I decided to use it up and mix it with the rest of some grainy Neufchatel cheese that Derek had bought and disliked. Putting two mediocre ingredients together isn't exactly recipe for success, but I thought I'd give it a try. I also threw in some vanilla and cinnamon and hoped for the best after blending all of the elements together.
Makes 24 mini cupcakes.
MY REVIEW: First the cupcakes. The batter, to me, seemed pretty thick and didn't WOW me. Without many additives to a normal batter recipe except for a scant portion of cocoa powder and red food coloring....and vinegar...the batter tasted a bit floury. But not knowing what it is supposed to taste like, I still hoped for the best and threw the cupcakes into the oven.
Thankfully, they puffed up nicely and turned out looking like a red velvet cake. The next test was taste. They were good - but just good. They were not heavy but they were not super light and fluffy. And the flavor was interesting, again, good, but not great. I'd rather have a chocolate or lemon...or....gasp...carrot cupcake.
And the frosting was OK, a little grainy due to the already grainy cream cheese substitute that I used, but the flavor ended up being pretty good! Still, I asked Derek to use some of his frosting as I'd be taking these to the office and didn't want to serve frosting that would be slightly off-putting in texture.
My Cupcake Grade: B
Now onto Derek's Carrot Cake, compliments of Ad Hoc at Home.
Ad Hoc Carrot Cupcakes
Cupcakes
2 cups cake flour
1 teaspoon baking powder
1 teaspoon baking soda
2 teaspoons ground cinnamon
4 large eggs
1/4 cup whole milk
1 teaspoon vanilla paste or pure vanilla extract
1 cup granulated sugar
1 cup packed light brown sugar
1 cup canola oil
3 cups finely shredded carrots
1 1/2 cups coarsely chopped toasted walnuts (Derek used pecans, un-toasted)
Cream Cheese Frosting (makes about 3 cups)
1 1/2 pounds cream cheese, at room temperature
1/2 pound (2 sticks) unsalted butter, cut into chunks, at room temperature
1 1/2 cups powdered sugar, sifted
1 teaspoon vanilla paste or pure vanilla extract
Preheat the oven to 350°F and have all ingredients at room temperature. Also have your cupcake liners and pans ready.
Wash and peel your carrots. Using a grater, shred your carrots and set aside.
Using your stand mixer, beat the eggs, milk, vanilla extract, granulated sugar, and brown sugar until smooth.
Add in the oil.
Sift the flour, baking powder, baking soda, and ground cinnamon. Slowly add this and mix.
Add in the shredded carrots.
Using an ice cream scoop, divide the batter evenly into the cupcake liners.
Bake for 20-30 minutes (depending on your oven) or until a cake tester comes out clean.
Remove the cupcakes and let it cool to room temperature.
For the Frosting:
Have all ingredients ready at room temperature.
Using your stand mixer, beat the cream cheese until smooth.
Add the butter and mix until smooth. Include the pure vanilla extract.
Beat in the icing sugar until frosting is smooth.
Once the cupcakes have cooled, frost and eat!
MY REVIEW: OK so I'm not sure who to give the credit to, the chef who crafted, or a least blessed, this recipe, or the chef who executed it for me. I suspect credit is due in both arenas. These were fabulous, simply to die for. Wow.
From the start you could tell these were a totally different product than what I had produced with the red velvet cupcakes. The batter was very runny in contrast to my slightly thick batter. However, this runny batter baked up into an extremely moist and light cupcake that certainly satisfied my carrot cake loving soul.
He could have reduced the sugar by a little bit - and if he had made larger cupcakes, I would say the pecans should have been larger as they were diced pretty fine - but for the small bite size cupcake - it worked! I'd love to also try raisins in it since I love that addition to carrot cake - Derek does not.
The frosting was good as well - nothing special, just a solid cream cheese frosting that went beautifully with the cake.
Derek's Cupcake Grade: A
Bare:

Iced:

Gosh, I hate to admit it - but his cupcakes, regardless of my flavor preference, were just a cut above my product. I want one this moment as I type this...You better believe that I'm ready for another battle....
Carne Asada Tacos or Salad
A break from the Ad Hoc at Home recipe binge!! This time Derek went back to his "roots" and opted for a Bobby Fly recipe instead. This post is following suite with several of my recent posts that are void of the true recipe that was followed to make the final product. Why? Because I had very little to do with it.
Derek wanted to make tacos and I opted for a salad using similar base ingredients:
Carne Asada Tacos (or Salad)
http://www.foodnetwork.com/recipes/tyler-florence/tacos-carne-asada-recipe/index.html
Ingredients
1 pound flank steak, trimmed of excess fat, cubed
1 recipe Mojo, recipe follows
Olive oil, for coating the grill
Kosher salt and freshly ground black pepper
"Red Sauce"
Directions
(steak portion mainly Bobby Flay's Recipe) Lay the flank steak in a large baking dish and pour the mojo over it. Wrap tightly in plastic wrap and refrigerate for 1 hour or up to 8 hours, so the flavors can sink into the meat. Don't marinate the steak for more than 8 hours though, or the fibers break down too much and the meat gets mushy.
When ready to cook, heat a little olive oil in a pan and saute the beef until cooked medium to medium well (your call). Add salt and pepper if desired. Stir in enough red sauce to coat the meat - heat for about a minute.
Mojo:
2 garlic cloves, minced
1/2 jalapeno, minced
1 handful fresh cilantro leaves, finely chopped
Kosher salt and freshly ground black pepper
1 lime, juiced
1/2 orange, juiced
1 tablespoons white vinegar
1/4 cup olive oil
Place all ingredients except the olive oil in a blender and blend until a paste is formed. Slowly stream in the olive oil while continuing to blend the mixture.
Pico De Gallo:
2 vine-ripe tomatoes, chopped
1/4 medium red onion, chopped
1 green onion, white and green parts, sliced
1/2 Serrano chile, minced
1 small handful fresh cilantro leaves, chopped
2 garlic cloves, minced
1/2 lime, juiced
2 Tbsp. extra-virgin olive oil
1 teaspoon kosher salt
In a mixing bowl, combine all ingredients together. Toss thoroughly. Let it sit for 15 minutes to an hour to allow the flavors to marry.
"Red Sauce"
In addition to Bobby Flay's recipe, Derek made a red sauce - I do not know of any other term to classify it - but it was incredible. After cooking the steak, which he cut into cubes, he tossed the beef with the just enough of the red sauce (maybe 2-3 Tbsp.) in the pan to coat the steak and warm the sauce. The rest of the sauce was reserved for topping the tacos or salad, or eating with a spoon as I couldn't help but do...
2 large tomatoes, chopped
2 jalapeno peppers, chopped
1 white onion, quartered
4 cloves garlic, peeled
4 dried New Mexico chile pods
1 pinch salt and pepper to taste
about 1/4 tsp. each of cumin, cayenne, ancho chili powder, onion powder
2 Tbsp. EVOO
Place the tomatoes, 1 onion, jalapenos, and 4 cloves of garlic onto a baking sheet. Roast in the oven for about 20 minutes, until toasted but not burnt. Place the roasted vegetables, soaked chile pods, and spices into a blender or food processor, along with salt and pepper. Puree until smooth. Stream in the EVOO and blend.
For Tacos:
Homemade corn tortillas (used a recipe off of the masa flour bag)
Carne Asada
1/2 cup Pico de Gallo, recipe follows
2 limes, cut in wedges for serving
sour cream
avocado slices
"red sauce"

For Salad:
Torn butter lettuce, washed and dried
Corn Salsa (corn, lime juice, minced red onion, chopped cilantro, salt)
Pico de Gallo
avocado slices
Carne Asada
red sauce
jicama matchsticks
orange vinaigrette

That red sauce was to die for - it was certainly my surprise favorite of the meal. There's not much else to comment on - fairly standard meal components that went together beautifully.
Roasted Breast of Chicken and Vegetables (adapted from Ad Hoc)
And so Derek continues to plow through the Ad Hoc cookbook for guidance and meal perfection. Next stop: Chicken.
Rather than buying a whole chicken, he simply purchased a full chicken breast - bone-in, skin on - which has two full chicken breast servings on it. For two people, it's perfect, potentially with a little bit of leftovers to boot.
We didn't have turnips or rutabagas like the recipe called for so we just modified the roasted vegetable portion to include what we already had on hand. Don't be confused with the actual directions - they are for a whole chicken and the original vegetables. Cook time for a chicken breast needs to be based on internal temperature and not the time listed below so a thermometer is key - best to have on that can keep a constant read on the temperature while the meat is in the oven.
ROAST CHICKEN WITH ROOT VEGETABLES
(adapted from Thomas Keller’s Ad Hoc)
INGREDIENTS ARE WHAT WE USED, MODIFIED FROM WHAT THE ORIGINAL RECIPE STATED
1 whole chicken breast
1 clove garlic, mashed
fresh thyme sprigs
salt and pepper
5 medium carrots, peeled and chopped
2 cippolini onions, peeled and wedged (we used part of a red onion too)
1 medium potato (we had russet), skin-on and chopped
2 Tbsp. canola oil
1 T butter
1/2 lemon
RETURN TO THOMAS KELLER'S ORIGINAL RECIPE:
Remove the chicken from the refrigerator 1.5 hours before roasting.
Heat the oven to 475F.
Season the chicken inside and out with salt and pepper, add the garlic, 4 thyme sprigs, and the lemon half in the cavity. For a nicer presentation, truss the chicken.
Cut the rutabagas and turnips in similar sized pieces, about 3/4 inch wedges. Cut the carrots in half crosswise and again lengthwise. Keep the young potatoes whole, or, if they are a bit too big cut them in half. Place all veggies in a large bowl, add 1/4 cup of canola oil, 2-3 thyme sprigs, salt, pepper, and toss well. Transfer them to a roasting pan, make a small space in the center to place the chicken. Rub the remaining canola oil all over the skin of the chicken, seasoning it again with salt and pepper.
Just before roasting, add pats of butter over the breast, or brush with some duck fat (it gives a deeper flavor to the chicken,).
Roast at 475F for 25 minutes, lower the temperature to 400F and roast for 1 hour, but check the internal temperature after 45 minutes, if it reaches 160F remove the chicken from the oven. Allow the chicken to rest under an aluminum foil tent for 20 minutes before carving.
A few minutes before serving, place the roasting dish on the stove and heat the vegetables, moving them around to coat with the juices accumulated during roasting.

The vegetables were to die for. Why? because they were cooked in all of the chicken goodness for a long period of time. Therefore, they were probably not the healthiest version of the vegetable possible, but they were incredible. I don't see how any anti-vegetable person could not like them.
As for the chicken, due to the shape of the chicken breast, one part of the breast was super tender and moist while the other was probably equivalent to a normal piece of chicken that you'd be happy with but is just a little bit on the dry side. Both were tasty but when biting into a tender piece after a slightly dry one - wow, the difference is apparent.
This recipe is best eaten skin on. I was amazed by how crispy the skin was - like potato chip crispy. though I tried a few bites with the skin and realize that it's definitely the way to go taste-wise, for health reasons, I removed most of the skin and have to then season the actual meat with a little salt, pepper, and lemon juice to add a little more flavor. The chicken with the skin is certainly flavorful enough on its own.
Another restaurant quality meal compliments to Thomas Keller and Derek for interpreting his directions!
Salt Crusted Red Snapper
Derek has been dying to make a salt-crusted whole fish, a concept that hardly excites me. Despite my obvious disapproval of this meal, Derek went ahead an bought a fish (AND made me pay for my portion!!!!) so the meal was inevitable.
Here's what he did:
Keller’s Salt-Crusted Striped Bass (we used Red Snapper)
One 3- to 4-pound striped bass, gutted, fins cut off with scissors
4 cup kosher salt
8 large egg whites
About 1/2 bunch flat-leaf parsley
Fronds from 1 fennel bulb (reserve the bulb for another use)
2 thin lemon slices
2 thin orange slices
Extra-virgin olive oil
Optional accompaniments: Gremolata or Lemon Aioli (recipes included)
Cook’s notes: Cleanup on the sheet pan was a challenge. The salt mixture baked into a cement-like mass and I had to use a sturdy spatula and hot-water soaking to remove it. I asked Keller if the pan could be lined with parchment paper or if a home cook could use a disposable aluminum pan. He said yes to both.
Procedure:
1. Remove fish from refrigerator and let stand for 15 to 30 minutes. Preheat oven to 425 degrees.
2. Stir together salt and egg whites in medium bowl. On a large ovenproof platter or baking sheet, make a layer of salt crust mixture just over 1/4 inch thick and slightly larger than the fish, patting mixture down into an even layer.
4. Stuff the back end of the cavity of the fish with parsley and fennel, using twice as much parsley as fennel. Place citrus slices next to them inside the cavity, following the shape of the belly. Center the fish on the salt crust. Working from the bottom to the top of the fish, pat the remaining crust mixture over it in a thin coating, covering it completely. (You may have more of the salt mixture than you need.) Using a paper towel, pat the crust to remove any excess moisture.
5. Roast for about 40 minutes, turning the pan around once after 20 minutes, until the thickest part of the fish registers about 125 degrees (insert the thermometer though the crust). Remove from the oven and let rest for 10 minutes.
6. To serve the fish, have on hand a serving platter and a try to hold the crust and bones. Crack the crust with a wooden spoon or mallet, breaking it into large pieces and carefully remove it. Push back the skin and using a palette knife or narrow spatula, lift the top fillet, in large pieces, from the frame of bones that runs down the center of the fish and place on the serving platter. Then, starting at the tail end, lift the frame of bones out in one piece. Discard the fennel and parsley, and reserve the citrus slices to use as a garnish. Check the bottom fillet for any visable bones and remove them, then lift out the fillet in large pieces and transfer to the platter. Garnish with the citrus slices and drizzle with olive oil. If desired, serve with either Gremolata or Lemon Aioli. And, if you like, accompany the fish with saffron rice (we did saffron couscous).
In the Salt Crust

Freed from the Salt Crust

This ended up being the first real "fail" from Ad Hoc. I probably ate more of the fish than Derek did as he was just so disappointed. I truly didn't think it was that bad. Sure, it wasn't the most tender fish I've ever had in my life, but it was far from bad. Derek blamed the size and type of fish - it was only a bit over a pound and really didn't produce a ton of meat - but it wasn't worthy of a trip straight to the trash can. So I ate my very small portion and supplemented it with a ton of yummy couscous while Derek picked at the fish, sulked, and then made a hot dog...
Needless to say, I will have to go through this again as Derek is determined to make this work...
Also - I am still picking up scales from the floor of our apartment - they went everywhere while Derek scaled the fish. Next time - I'm ensuring that he A) buys a scaled fish (preferred) or B) goes outside to scale it - I never want to see those nasty scales on my floor again!
Ad Hoc Poached Salmon with Caramelized Cabbage
On a night that I was hoping to have an easy meal picked up from Whole Foods Market, Derek decided to make a "quick" poached salmon. Not being a fan of salmon and craving a big salad, I opted out and kept with my original plan. We were to spend the night cooking up some chili for the super bowl so I didn't want to spend any extra time in the kitchen having to cook for dinner as well! But when Derek is set on something, he's going to do it...so he insisted on making himself a quick and easy poached salmon from Ad Hoc at Home.
Disclaimer: nothing with Derek is every as quick or easy as he expects. This was no exception.
He had to make the homemade court boullion for the poaching liquid for the salmon. I said just pick up a high quality stock at Whole Foods - but he refused (after the fact he admitted that he should have taken this shortcut). He also had to make an "easy" side dish that required many steps: cooking up bacon, blanching the cabbage, cooking it in batches, making melted onions....this is where women are so much better at gauging time. If you look at all those steps, I can automatically say that this is not a meal that qualifies for 30-minute meals. But alas, I spent my evening snacking on food while I waited for Derek to finish his meal so I could eat mine because I prefer to eat dinner together than separately if we are both at home.
Here is what he had to go through - all by himself - for his "quick" meal:
Ad Hoc Poached Salmon
Court Bouillon
2.5-3 lb salmon (individual pieces OK)
Maldon salt or another flaky sea salt
small dill sprigs
EVOO
Make the court bouillon according to directions in Ad Hoc (p.341) - strain the liquid into a saucepan and reserve the solids. Heat the liquid to 200 degrees over medium-high heat.
If you do not have a fish poacher - you can use a deep roasting pan and place a rank at the bottom to make removal of the cooked fish easier. Put fish skin side down on the rack and add enough bouillon to cover the fish completely. Add extra reserved vegetables if space allows. Bring liquid to 200 degrees and adjust heat as necessary to maintain temperature of 190-200 degrees.
If serving the fish hot - remove the pan from the heat when the internal temperature reaches 120 degrees. Let salmon sit in the liquid until it reaches 125 degrees. Remove salmon and place on serving dish. Sprinkle with salt and dill and drizzle with olive oil.
Caramelized Cabbage
Ad Hoc at Home
1 head Green Cabbage
canola oil
salt
1/4 cup chicken stock
3 T. butter
1/4 cup plus 2 Tbsp. melted onions
Cut cabbage in half through the core. Cut each half again through the core. Cut out the core and discard. Turn a piece of cabbage cut-side down and cut crosswise into three sections. Beak apart the piece of cabbage over a bowl; cut out and discard any tough ribs. Repeat with remaining cabbage.
Bring a large pot of salted water to a boil. Prepare an ice bath. Add cabbage to the water and boil for 1.5 to 2 minutes until the leaves are wilted but still crisp. Drain, chill in the ice bath, and drain in a strainer. Place strainer over a bowl and press down on the cabbage to drain excess moisture.
Shortly before serving, heat some canola oil in a large pan over medium-high heat. Add about 1/3rd of the cabbage, lower the heat to medium and cook for about one minute. Separate the cabbage with a spoon so to have as much surface against the hot pan as possible. Season with a generous pinch of salt and let cook, without stirring, for 3 to 4 minutes to evaporate any remaining water to caramelize the leaves. Watch carefully - you want the leaves to brown but not burn - adjust heat as necessary. Cook stirring the cabbage constantly for another 2 to 3 minutes, until tender. Transfer to a bowl. Repeat with remaining batches of cabbage, adding more canola oil as needed.
Combine all of the cabbage and the stock in a large saute pan and bring to a simmer over medium heat. Stir in the butter and onions and cook for about 3 minutes tossing often to heat the cabbage through. The butter should be creamy but not separated - if it has separated, stir in a bit more stock.
Serve.
NOTE: Derek added cooked bacon (as recommended by the recipe) that he cooked first at a low, slow temperature to render the fat, and then set the pieces aside. He cut the bacon into pieces and added them to the cabbage just before serving.
Melted Onions
8 cups sliced onions (about 3 large onions)
kosher salt
8 Tbsp. butter
1 sachet (1 bay leaf, 3 thyme sprigs, 10 black peppercorns, 1 garlic clove)
Put onions in a large saute pan set over medium low heat and sprinkle with two generous pinches of salt and cook, stirring from time to time, for about 20 minutes, until the onions have released much of their liquid. Stir in the butter and the sachet, cover with a parchment lid and cook slowly over low to medium low heat for another 30 to 35 minutes. The onions should look creamy at all times and if the butter separates or the pan looks dry at any time, add some cold water and stir well to re-emulsify the butter. The onions should be meltingly tender but not mushy or falling apart. Season to taste with salt.

Goodness! Yes, finally we did get to eat. I tried the salmon and reassured myself that I can no longer eat cooked salmon and truly enough it. I guess it was OK but certainly not worth all of the effort for the homemade poaching liquid that left the salmon still tasting like salmon (perhaps this is a good thing for those who actually like salmon that is cooked!)
Derek said the cabbage was the best he had ever eaten in his life. I could possibly agree - but not without reservation. It was good because it was not good for you. Bacon, melted onions (melted via butter), and more butter....of course it's going to be good! Mind you he did cut down on the butter a bit but it was certainly still a rich dish of otherwise perfectly healthy vegetables in their natural state. But yes, they were good...very good...dinner party worthy good - just maybe won't become our staple method of preparation for weeknight "healthy" meals.
Tuesday, February 1, 2011
Tuna Poke
This dinner brought me back to my vacation in Hawaii - picking up tuna poke fresh from the grocery store (yes, a grocery store deli counter with about 8 different types of fresh poke) and dining al fresco on the beach. The tuna nearly melts in your mouth and pairs perfectly with its trusty sidekick - rice. A fabulous combination of sesame oil, soy sauce, green onion, avocado, jalapeño, cucumber, and maybe lemon or lime...mixed with quality tuna makes a simple and impressive meal.

Though we try to not have white rice whenever possible, I felt that this meal just needed it. Our only brown option was jasmine which would (in my opinion) not fit the bill for this meal - perhaps a normal plumpy brown, but not the characteristically thin jasmine. So white rice it was.
Derek used a recipe that we received from that Hawaiian grocery deli "poke chef" as his base and tweaked it here and there and added avocado. In my search, this seems to be a fairly good representation of what he did:
Fresh Ahi & Avocado Poke
source: http://www.fishmaui.com/fish-recipes/ahi-recipes/ahiandavosalad.html
Main Ingredients:
3/4 pound sashimi grade tuna steak, diced
1/2 cup diced cucumber
1 avocado - peeled, pitted and diced
1/4 cup chopped green onion
1 1/2 teaspoons red pepper flakes
1 tablespoon toasted sesame seeds (did not use, would have been good)
1 1/2 teaspoons lemon juice
2 teaspoons sesame oil
1/2 cup soy sauce
DIRECTIONS:
In a medium bowl, combine the ahi, cucumber, avocado, green onion, red pepper flakes and sesame seeds. Pour in the lemon juice, sesame oil and soy sauce, and stir carefully to blend so as not to mash the avocado. Place this bowl into a larger bowl that has been filled with ice. Chill in the refrigerator for 15 minutes, but no longer - the terrific freshness of the fish will be lost.
We served this with white rice, some daikon sprouts and store-bought seaweed salad. Now if only I had the beach to pair with it as well....
Subscribe to:
Posts (Atom)