Showing posts with label Main. Show all posts

Sunday, August 16, 2015

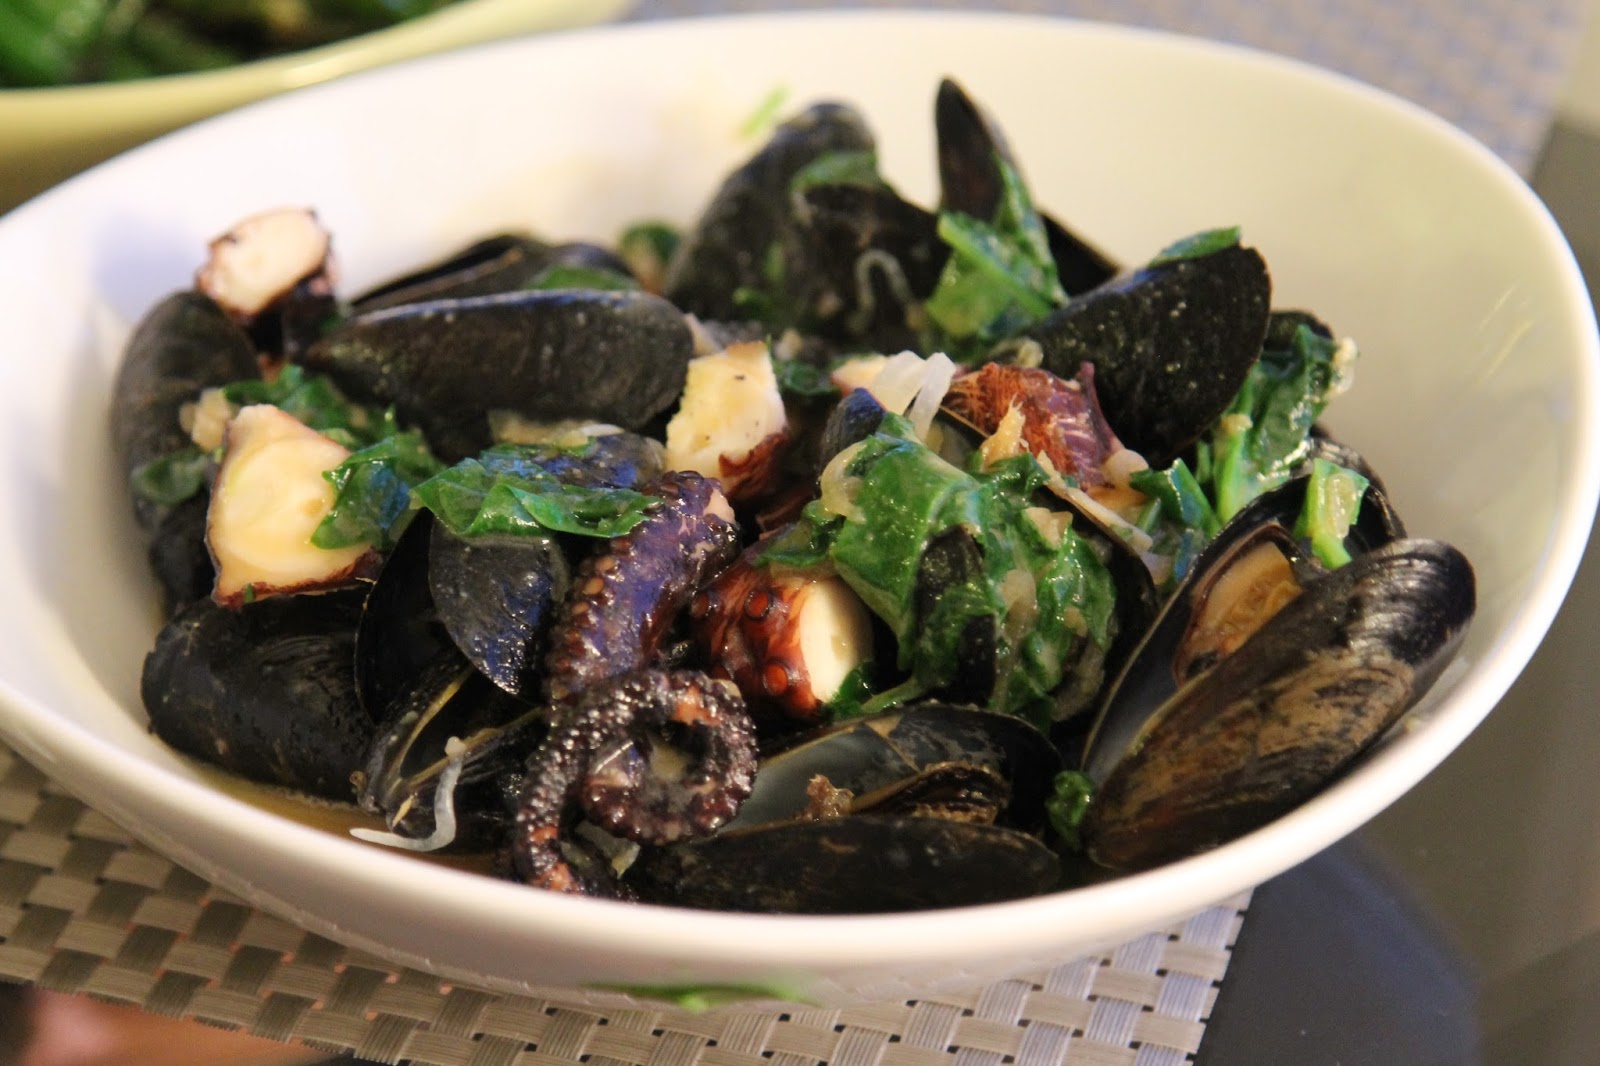
Sake Miso Mussels with Wilted Greens and Crispy, Oven Baked Fries


Check this out for an insanely delicious meal that is impressive enough to deserve a spot on the Sunday night menu but simple enough to make an appearance during the week.

What's funny about this meal selection is that I'm the one who chose it and, until very recently, I was still weary of mussels. While over the years I have exponentially expanded my palate, mussels never quite made their way to the top of my list. I was fine with clams, loved oysters, but couldn't quite bring myself to becoming a mussels fan. But then something changed. All of a sudden, I found myself actually enjoying these little meaty sauce vessels. They can be messy but if cooked right, they are a true delight. And I've learned that they are actually really easy to cook correctly! Mussels are one of the only foods that actually tell you when they are done! Just watch out for the moment they open and voila, you should have a perfectly cooked mussel!

One of the trickier preparations is in the side dish: crispy baked french fries - emphasis on the crispy. I can't tell you how many times I have popped fry-cut potatoes into the oven only to result in a limp roasted product. Only recently have I figured out the secret: boiling the potatoes before baking.


Cut Russet potatoes into your desired shape (no need to remove the skin) and place them in a pot of salted, boiling water for around 4-6 minutes (depending on the size of the fry) until the potato just begins to soften. What you are doing here is essentially pulling out the starch which can prevent the fries from getting crispy. Then, use a slotted spoon to remove the fries and place them on a towel or rack to "dry out." (You don't want water to stay in the potato before roasting). After a toss in olive oil and about 25 minutes in a 400F degree oven, you have yourself perfectly crispy and guiltless baked french fries. All ready for dipping in the mussel broth!


I also picked up some shishito peppers from, surprise, Trader Joe's! These are one of my favorite simple treats. Preparation is simple and the result is addicting. Heat some oil in a heavy pan until almost smoking. Then add the peppers, stirring during cooking until you see even blistering (beautiful browning) of the pepper. This only takes a few minutes. This serves to soften the pepper and bring a beautiful depth of flavor with the quick stir-fry.

And now for the key to the preparation: coarse sea salt (or regular if that's all you have). Sprinkle the salt liberally over the peppers. Pop them in your mouth and you won't be disappointed. Only a few peppers will be "spicy" so it's a bit of a gamble which adds to the fun of the dish.


And if the crispy bakes fries or blistered shishito peppers weren't excitement enough - we made a fabulously simple, Asian-inspired mussel dish.

We had sake and miso already in our refrigerator and were thinking of our typical preparation of a miso-glazed fish. But that is usually best refrigerated and marinated overnight so I had the idea of using those ingredients in a simple mussel dish. I found a perfect recipe online and was super-pleased with the result. The broth is full of umami (think depth) with a hint of velvety sweetness. I could (and did) just drink it. Take a mussel, fill up the shell with the broth, and enjoy!


Sake Miso Mussels with Wilted Greens
original recipe found here

Ingredients:
  • 2 tablespoons neutral oil or coconut oil
  • 2 medium garlic cloves, thinly sliced
  • 1 tablespoon freshly grated ginger (from 1-inch piece)
  • 2 medium shallots, thinly sliced
  • 2 pounds mussels 
  • 1 1/4 cups dry sake or white wine
  • 2 tablespoons unsalted butter
  • 3 tablespoons white (or other mellow) miso
  • 4 ounces baby spinach or other delicate leafy green (i.e. not kale), thinly sliced
Directions:
  1. Heat oil in a medium 3-quart saucepan or cast iron pot over medium heat. When oil is warm and shimmers, add shallots, turn to coat and cook until just softened. Add ginger and garlic and cook until fragrant, about 1 minute. Add mussels, stir to coat, then add sake or wine and cover. Cook until mussels open, about 3 to 5 minutes.
  2. Using a slotted spoon, remove mussels to a serving plate (discard any mussels that don't open). Add miso and butter to the saucepan and stir until smooth. Immediately remove from heat, stir in greens until just wilted, pour over mussels (avoiding any grit at the bottom of the pan), and serve with crusty bread or french fries.
Note: we had some octopus that had been prepped (boiled) the previous night so we broiled that (to add crispiness), cut it, and added it to the mussels to a) be resourceful and use up leftovers and b) add some additional interest and texture to the dish.


Sunday, May 31, 2015

Goan Shrimp and Spinach


Why not treat myself on a solo Friday night in? Large, succulent shrimp, a deep, zest curry, and lightly sauteed spinach rounded out a fabulous dinner for one (not to mention a few glasses of wine).

I was feeling a bit adventurous to go beyond my standard solo dinner of a buddha bowl of sorts. But I didn't want to go too adventurous to where I would spend my whole night in the kitchen. So when I ran across this recipe in my Food & Wine magazine, I was intrigued as I already had most of the ingredients and with a "total time" of 20 minutes to prepare, I was sold.

This isn't your normal curry in the sense that it is not a "saucy" dish per se. Curry actually doesn't have to be! The definition (or A definition) of curry is "a food, dish, or sauce in Indian cooking that is seasoned with a mixture of spices." So here you go - a dish that is seasoned with a mixture of spices. Curry.

What I loved about this recipe was the beautiful incorporation of tang, heat and sweetness. You've got coconut, coriander, cumin, chile and brown sugar as the "spice base" for the dish. Using whole spices really helps to take the depth of flavor to another level. And always, ALWAYS, toast your spices if preparing a curry. Your tastebuds will thank you.


The toasted spices go into the blender with water, tamarind (hello TANG), garlic and ginger. The result is a beautiful paste that serves as the base for the dish.

If you are ever amazed at the complexity of flavors in Indian cuisine, it is because they have really figured it out when it comes to blending spices and flavors, and marrying them in such a way that no single ingredient overpowers the dish. Instead, they work together in beautiful harmony.


The curry base is then added to sauteed onions that have been "heated" by the jalapenos (to be discarded, unless you are a true Indian and able to take on a ridiculous heat index).


Finish it up with a quick cook of the shrimp (less is more) and spinach and you've got a fabulous dish with complex flavors, without the complex cooking process. Easy enough for a weeknight meal - enjoyable enough for a solo Friday night.

Goan Shrimp and Spinach

Saturday, May 16, 2015

Parchment Baked Halibut with White Wine and Fennel


This is quite simply one of the easiest and most impressive dishes that I know: fish baked in parchment paper. There are fancy names for this such as "______ [insert name of fish] en papillote (French)" or "en cartoccio (Italian)" - all which really just mean cooking in a folded parcel. I ordered this at an Italian restaurant recently - Halibut en cartoccio - and spent nearly $30 on it (work dinner, so I technically did not pay). Knowing how simple it is to make this dish at home certainly did not take away from my enjoyment of the restaurant dish as it was quite fantastic. Instead, it made me even more excited to try more variations of this dish in the comfort of my own home (for a much cheaper price).

The concept of cooking fish in paper is basically to serve as a vessel for trapping juices and steaming the fish - keeping it nice and moist and infused with the flavors included in the pouch. One of my favorite flavor combinations is with fennel, lemon and white wine. Fresh flavors that delicately infuse into the fish (halibut is my preferred go-to) and work beautifully together.


It's a good idea to cook your vegetables (if using) for a bit before bundling them with the raw fish in the parchment. This just ensures that your vegetables will be cooked through when your fish is ready. Additionally, beginning the cooking process allows for the vegetables to start breaking down and releasing their own natural juices which allows for a great depth of flavor infusion.

This time, we cooked thinly sliced fennel and shallot with olive oil and seasoned simply with salt and pepper. The vegetables were then mixed with lemon zest, lemon juice and white wine. Then scattered over a raw piece of fish (halibut) and sprinkled with thinly sliced garlic and thyme. Simple and fabulous.


We used an inexpensive (around $12) bottle of wine that we picked up at the local grocery store to "steam" the fish in. Come to find out - this is a really decent Sauvignon Blanc and a good value at a low price point. We always want to cook with something that we will want to drink alongside the meal so that's why you won't find any bottles of 2 buck chuck (or an equivalent) in our kitchen. Quality ingredients = quality food. Bad wine does not lead to good food. So a $12 bottle is cheap enough that we don't feel bad using it for cooking - but we also can enjoy a glass with the end result. The Sauvignon Blanc was a great choice because it was crisp and has a tart fruitiness and hints of lemon. The brightness goes beautifully with fennel and lemon.


Roasted baby purple potatoes added the "heft" to the dish, bringing a nearly creamy and indulgent texture wrapped in a crisp and slightly salty skin. Fabulous. If you haven't tried purple potatoes - you are missing out. They are packed with more antioxidants that your standard white potato and also add a wonderful pop of color to a dish.


Sunday, April 26, 2015

Butternut Squash, Chickpea and Lentil Stew


Wintertime in Chicago can easily become and excuse to hibernate and indulge in warm comfort food. A crisp salad and a smoothie just doesn't have the same appeal when it is below freezing outside. Instead, something rich and substantial is usually more appetizing in the wintertime. Unfortunately, the equation of "get out less + eat more" doesn't really set you up well for the warmer weather and skimpier clothes that are inevitably coming at the end of winter. That's why when I find a dish that meets that comfort need and also gets an "A" in the health-department, I'm a happy hibernator.

Here's a lovely dish that is easy to make, hearty, healthy and vegetarian. The heft of the lentils, chickpeas and butternut squash is satisfying enough to please any meat-eater. Simmered with warm spices of cumin and cinnamon paired with a touch of heat from red pepper flakes and topped off with a cool tang of Greek yogurt - this is a dish that you should make a full batch of and keep the rest for leftovers as it re-heats beautifully.

The stew is certainly equipped to stand alone on the dinner table. However, we decided to serve it over a bed of quinoa with wilted spinach. We also added some sliced chicken sausage for contrast. Certainly not necessary but we enjoyed the combination.

Cheers to it almost being swimsuit season!

Butternut Squash, Chickpea and Lentil Stew
serves 4-6

Ingredients:
  • 1 teaspoon coconut oil (olive oil works fine as well)
  • 1 onion, diced
  • 6 cloves of garlic, minced
  • 1 Tbsp. tomato paste
  • 2.5 teaspoons cumin
  • 1/2 teaspoon cinnamon
  • salt and freshly ground black pepper, to taste
  • 1 can (15 oz) chickpeas, rinsed and drained
  • 1 can (28 oz) diced tomatoes
  • 2.5 cups organic vegetable or chicken broth
  • 1 lb. butternut squash, peeled, seeded and cubed
  • 1 cup green lentils, rinsed well
  • 1/8 teaspoon saffron, soaked in 1 Tbsp. warm water
  • juice of 1/2 a lemon
  • 1/4 teaspoon red pepper flakes
  • 1/3 cup chopped cilantro (plus additional for garnish)
  • Greek yogurt for garnish
Directions:
  1. Heat the oil in a medium pot over medium heat. Add the onion and garlic; cook a few minutes or until the onion becomes softened.
  2. Stir in cumin, cinnamon, tomato paste, salt and pepper (to taste); cook for a few more minutes until spices are fragrant. Add chickpeas, tomatoes, broth, butternut squash, lentils and saffron. Bring to a boil, then cover, reduce heat and simmer for 15-20 minutes or until butternut squash is tender and lentils are fully cooked.
  3. Stir in lemon, red pepper flakes and cilantro. Taste and adjust seasonings as necessary. Garnish with extra cilantro and Greek yogurt, if desired. 

Quinoa with wilted spinach

topped with some sliced chicken sausage

Smothered by the delicious veggie stew and topped with yogurt and cilantro


Monday, March 30, 2015

Spaghetti with Clams, Squid and Braised Greens


On my plane ride home last night, I was flipping through an issue of Food & Wine magazine and came across this recipe that fit the bill for a healthy-ish one-pot meal. You have pasta, seafood and greens, all brought together by a luscious and simple red pepper wine sauce.

It's probably no surprise by now that I love all-inclusive dishes. Throw together the veggies, carbs and proteins and I am a happy girl. It's like a hot version of a salad in a way. I love salads because they can become a vessel for whatever fresh ingredients you want. Why not take on the same concept with a hot dish? And despite the various components of the dish - they are all simple to prepare and come together beautifully making it an easy weekday meal that could also impress guests for a dinner party dish that doesn't cause stress.
On my plane ride home last night, I was flipping through an issue of Food & Wine magazine and came across this recipe that fit the bill for a healthy-ish one-pot meal. You have pasta, seafood and greens, all brought together by a luscious and simple red pepper wine sauce.

It's probably no surprise by now that I love all-inclusive dishes. Throw together the veggies, carbs and proteins and I am a happy girl. It's like a hot version of a salad in a way. I love salads because they can become a vessel for whatever fresh ingredients you want. Why not take on the same concept with a hot dish? And despite the various components of the dish - they are all simple to prepare and come together beautifully making it an easy weekday meal that could also impress guests for a dinner party dish that doesn't cause stress.


The ingredient that brings the whole dish together is roasted red pepper (nope, not tomatoes as you would probably first suspect). While you could roast your own red peppers, there are some great options in the store that conveniently take the roasting step out of the cooking process for you. With that said, there are also some pretty awful roasted red peppers in the store - you know the ones that have an almost bitter or metallic taste? Those are probably at the cheaper end of the spectrum. Spend a dollar or two more and get some quality roasted red peppers. Your tastebuds will thank you!

The sauce is really quite simple - which is what makes this dish so awesome. It's just white wine that has been simmered with garlic and clams - minus the garlic and clams - and add the roasted red pepper. Blend and done.

The rest of the dish can be tailored to your taste. Get some kind of green - we used collard greens, but swiss chard would work out equally as well. Kale may be a bit tough for this dish but is another possibility. For the seafood - we added calamari to the mix so it wasn't just clams. If you want fish - add fish! Though it is important to note that the fish or calamari would be cooked along with the greens and not with the wine sauce.

Altogether, a really fabulous and easy dish for my only dinner at home in a two week span. It was perfect.


Spaghetti with Clams and Braised Greens
from Food & Wine - January 2015

Ingredients:
  • 1/2 cup extra-virgin olive oil
  • 8 garlic cloves, crushed
  • 4 dozen littleneck clams
  • 2 cups dry white wine 
  • 2 jarred roasted red peppers, drained
  • 1 tsp. crushed red pepper
  • 1 lb. Swiss chard or collard greens, stemmed and chopped (8 cups)
  • 1/2 lb. spaghetti
  • 2 Tbsp. unsalted butter, cubed and chilled
  • 1 tsp. grated lemon zest
  • 1 Tbsp. fresh lemon juice
  • 1/2 cup grated Parmigiano-Reggiano cheese, plus more for garnish
Directions:
  1. In a large pot, heat 1/4 cup of the oil. Add half of the garlic and cook over moderate heat, stirring for 1 minute. Stir in the clams. Add the wine and bring to a boil. Cover and cook over moderately high heat, stirring occasionally, 5 to 7 minutes; as the clams open, transfer them to a baking sheet. Discard any unopened clams. Strain the cooking liquid through a sieve into a blender. Add the roasted peppers and puree until smooth.
  2. Wash out the pot, then heat the remaining half of oil in it. Add the remaining garlic and cook over moderate heat, stirring for 1 minute. Stir in the crushed red pepper and Swiss chard in batches until the chard is just wilted, about 3 minutes. Note: If you are cooking squid you can add it here with the chard or collard greens.
  3. In a large pot of salted boiling water, cook the spaghetti until al dente; drain. Add the paste to the swiss chard mixture along with the butter, lemon zest, lemon juice and 1/2 cup of the grated cheese. Add the clams and toss to heat through. Transfer the pasta and broth to shallow bowls, garnish with grated cheese and serve.

Sunday, March 15, 2015

Cauliflower Crust Pizza


Since going gluten-free nearly two years ago - I have been amazed with how easy it is to substitute typically gluten-filled dishes with a gluten-free counterpart. It doesn't hurt that food manufacturers are eagerly catching up and catering to the growing gluten-free trend. Pasta has sufficient substitutes - flours to make pies, cookies and cakes....all readily available. However, what I still have yet to find a solid substitute for is a perfectly crisp and chewy Neapolitan pizza. These are the pizzas that are thin enough that you can eat an entire one yourself - topped simply (I prefer simple Margarita - mozzarella and red sauce with basil) and let's the quality of ingredients shine.

When it comes to gluten-free pizza crusts - I've encountered a more cracker or biscuit-like product that merely serves as a vessel for sauce and cheese. I've actually found myself taking on a habit that I used to observe in disbelief: leaving the crust of the pizza (the part without any cheese or sauce) unconsumed. Before - I always thought the best part of the pizza WAS the crust! Now - with the gluten-free alternatives, I sadly understand the desire to "move on to the next piece."

Because I can't find any fabulous bread alternatives for pizza crust - I've found that the best option is to explore a unique take on a crust - not directly comparable to a pizza dough. Enter "Cauliflower Crust." Here we find no attempt to be a Neapolitan pizza crust - but rather, an attempt to redefine what crust can be.


Who ever said that these bad boys can't play in the pizza space as well? They are fully capable of morphing into something new and oddly delicious. And the bonus part? These are actually great for you (unlike that absolutely perfectly crisp Neapolitan crust that I dream about).

What's also hard to believe is that those two cauliflower heads that you see were consumed in full by two people in one sitting. Should I be ashamed? Or proud?

In reality you are only eating the circumference of the cauliflower - if you will. So it's not like I started gnawing on the head of cauliflower and ended when it disappeared. It's actually amazing what this gigantic vegetable turns into in order to make it a "crust."


You first cut off all of the florets - being sure to trim them closely so as to not have any long stems which contain a large amount of liquid.


Then you put the florets through a food processor and pulse until a perfect cauliflower "snow" has formed. The mixture should not have any hard pieces in it and should be uniform in light, airy texture. You'll have to do multiple batches in the food processor (keep the batches on the small side) - particularly if you are using two heads for two crusts. Our rule of thumb - one decent head of cauliflower for one crust. And because the crust is "light" - Derek and I can each down a full pizza without too much guilt.

Saturday, March 7, 2015

Casarecce Pasta with Mushrooms and Ricotta


When I come home from a work trip - or any trip involving several out-of-home meals - I crave nothing more than a nice home-cooked meal. Truth is, I actually enjoy my time in the kitchen (no shocker there). And despite being tired on a Friday night - using the last of my energy to whip up a tasty meal sounded like the perfect finale to a long work-week.

My inspiration for the night: A deep craving for PASTA.

Funny that someone who adheres to a gluten-free diet craves a dish that is inherently banned from the ingredient list - naturally full of gluten. However, as a gluten-free diet grows in popularity and awareness, food producers are following suit and providing great gluten-free options - pasta makers included.

To pick up our recipe ingredients, we took a trip to Eataly - a gourmet Italian market and collection of eateries located in the heart of Chicago (and an easy walk from home). Now, certainly we know that gluten-free is not in the Italian language and is likely shunned in this environment. However, we had heard that they had a pretty good gluten-free pasta option so while the ratio of pasta options were about 1% gluten free to 99% gluten filled - we were still happily surprised that there were options beyond the standard spaghetti and linguine. 


Enter "casarecce" pasta.

"Casarecce pasta is shaped like a very narrow, twisted and rolled tube. This pasta is best used when served with chunky sauce and can be used in a variety of casserole dishes."

What I love about the shorter, shaped pastas is that they can act as part of a dish and not overtake the whole plate. You can have a bite of pasta and also a bite of another dish component. This provides the opportunity to incorporate more flavors and ingredients into a dish and to not have pasta over-load.

For our dish - I wanted a balance of richness and brightness with focus on the complementary natures of the ingredients rather than an all consuming sauce to bring the dish together.

A recipe from Bon Appetit served as the base guide for our final result: Strozzapreti with Mushrooms and Ricotta

This is a dish that has that richness that I was looking for from the ricotta and soffrito (cooked down vegetables). It has brightness from lemon, chives and mint. It felt indulgent but not sinful. It was a perfect "welcome home" comfort meal.


The recipe calls for a Soffritto. Similar to a "Mirepoix" in French cooking - this is an Italian flavor base made by cooking down onions, carrots and onion to develop a rich, cohesive flavor. With a ratio of about 2 onion (red onion in the recipe) to 1 carrot and celery and a slow stir-fry time of approximately 30-35 minutes - the soffritto becomes more than just 'vegetables' in a dish. Topped off with smoked paprika - this combination adds depth to a relatively simple pasta dish.


Saturday, February 14, 2015

Tahini Kale Macro Bowl


Sometimes (or really, most of the time) after a long workweek, all I want to do on a Friday night is open up a bottle of wine, put on cozies (technical term for yoga/sweatpants and a top), and lounge around my own apartment. I'm not sure if this is a sign of me getting older - but the moments of pure "me" time are supremely appreciated.

Derek had plans to go out with the guys so I made my own plans which consisted of wine, cheese, a book, a cheesy TV show that I had recorded (cough cough...The Bachelor) and a simple but healthy meal. Perfection.

Recently I had been looking back at some of my older blog posts and I realized two things:

  1. Many (most) of my pictures were terrible. Sorry, there's nothing I can do about that now. Chalk it up to bad lighting and a bad camera - and possibly a bad photographer as well.
  2. I used to eat so many more "Katie meals" (as I referred to them) which typically consisted of a meatless conglomerate of delicious and healthy grains and vegetables.
So when I had my solo night in - I took full advantage of returning to MY comfort food and prepared a fabulously healthy bowl - largely inspired by a dish I love at a local vegan restaurant - Native Foods. Their version uses: "Grilled Native Tempeh atop steamed kale, brown rice, creamy ginger sesame sauce, tangy sauerkraut and onions. Garnished with gomasio and green onion and served with a crunchy cucumber seaweed salad on the side." However, I always substitute tofu for Tempeh and quinoa for brown rice.

My homemade version added in a few additional substitutions/additions proving that this type of "goddess bowl" if you will, can really be adjusted to your own tastes and preferences and is simple to create if you think of it as, generally: 
  • Grain base (quinoa, brown rice, rice, couscous, etc.)
  • Sauteed greens (kale, spinach, collard greens, etc.)
  • Vegetables (cucumbers, carrots, mushrooms, avocado, etc.)
  • Protein (tofu, egg, shrimp, chicken, etc.)
  • Dressing (your call! though I really like a dressing with a bit of richness from tahini or avocado to bring together the elements of the dish)
Mix it all together and - voila! - you have a delicious, hearty and healthy meal. 

Tahini Kale Macro Bowl (inspired by Native Foods' Sesame Kale Macro Bowl )
serves 2 (approximately)

Saturday, February 7, 2015

Thai Red Lentil Soup with Aromatic Chile Oil from "Plenty More"


There's nothing better than a hot bowl of soup on a cold winter's night. I consider soup to be the salad of winter. What do I mean by that? Salads are my summer go-to, a "comfort food" if you will as it fits so well with the season. And there are so many variations when it comes to salads. No longer are they just a mound of lettuce with some tomatoes and cucumbers and maybe those julienne carrots. The possibilities are infinite by using what's in season - adding grains, or meat, or beans to "bulk" up the salad. In the wintertime, the same applies to a bowl of soup. Homemade soup does not have to stop at chicken noodle, tomato, or minestrone. Here too, the variations are endless.

To date, one of my favorite soup recipes has been one that I picked up from a co-worker's cookbook, oddly enough, called "Food from Plenty" by Diana Henry. The recipe for her Moroccan Lentil Soup with Yogurt and Chilli-Fried Onions (found here) is both deliciously comforting and complex in flavor, yet relatively easy to make. I've made it for dinner parties with rave reviews. There's something about a red lentil and some spice that can make a soup a home run.

When browsing through "Plenty More" I was, not surprisingly, intrigued when I came across a variation on a red lentil soup. This time taking on Thai flavors instead of Moroccan as in my go-to recipe. While I typically have more of the ingredients for the Moroccan style on hand as compared to Ottolenghi's Thai version - the number of ingredients for this soup is relatively few - making it another potential go-to for a quick, tasty winter (or autumn) soup.

Ingredients for the Chile-Infused Oil

The two components to the soup that actually took the bulk of the time to make were not the soup itself but rather the toppings: the chile-infused oil and the sliced sugar snap peas. Both of which could be excluded if you are short on time. Still, as my first run-through with this recipe, I didn't want to take any short cuts.


The preparation for the chile-oil was actually pretty simple. Cut up shallots, chile, ginger, garlic, etc. You don't have to be meticulous with chopping because the ingredients are simply there to infuse into the oil and will later be discarded. The only reason why I mention that this step could be skipped is because it is simply a bit time consuming - taking up approximately an hour with cooling time. But, the good thing is, once you've made it, you now have a delicious chile oil that you can keep on hand for other dishes. So if you have the time, make the effort - especially if serving this dish to guests. The homemade chile oil adds that "wow" factor that elevates this soup to a new level.

Sunday, January 25, 2015

Rice Salad with Nuts and Sour Cherries from "Plenty More"


Prior to purchasing Plenty More, I did a bit of due diligence in reading reviews to make sure that I knew just what I was getting into for my New Year's challenge. Of course, most were raving reviews which is to be expected based on Ottolenghi's previous publications. However, I was warned that many recipes included and intimidating number of ingredients (or type of ingredient) and that several dishes were quite complex. Well, this was one of them.

The general recipe is relatively easy in that you have a bunch of delicious ingredients and mix them all together to create a beautiful combination of flavors and textures. The difficulty comes in the sheer number of ingredients and the preparation of each individual ingredient. So this seemingly "one pot (bow) meal" is actually several pots before you get to the final bowl.

Still - was it worth all of the attention to detail cooking and preparing each individual ingredient??
Absolutely. Could you get away with condensing the recipe a bit (say - use one grain instead of three)? Sure.

Let's talk about these grains.
Uncooked basmati rice
Cooked basmati rice (came out perfectly - follow the recipe!)
Separate preparation of uncooked wild rice

Wednesday, January 14, 2015

Quinoa and Wild Garlic Cakes with Salbitxada Sauce from "Plenty More"


It's no surprise that I am a huge quinoa fan. And not a bandwagon fan - this has been a love that has been forming over several years now - well before the day that I went gluten free. It has this lovely nuttiness and toothsome texture (if cooked correctly) that makes it a great substitution to rice or couscous - or even potatoes. And the funny thing is, though it often takes the place of carbs on a plate, it actually has a good bit of protein - about 6g per 1/4 cup serving. Also, it doesn't have to just be pushed to the side of the dish. It is more than capable of being the star of the plate as we see here with Ottolenghi's masterful recipe (found on page 203 in Plenty More).


The cakes are not purely quinoa and a binder. No no. They are so much more than that as you can see in the image above. Cheese - but not just one kind - two kinds of cheese, onions, spice. And it all comes together to form a harmonious flavor that accentuates the nuttiness and texture of the quinoa itself.